Shopify Metafields: Key Use Cases
Note:
This page focuses solely on Shopify metafields managed directly in the Shopify dashboard.
Merchants can of course also manage metafields via a variety of third-party app, achieving the same results via a different interface.
Everybody’s talking about Shopify metafields these days - and with good reason. Use these handy little data sets in the right way and you’re ensuring your ecommerce store has the cleanest and most accurate handling of product data possible.
Findify has been working with metafields for years now, having long ago bet big on their eventual explosion in popularity.
What’s more, one of our biggest infrastructural developments of 2022, Active Sync, featured a heavy emphasis on metafields.
Essentially a big data ETL pipeline built on top of the Apache Pulsar streaming platform, Active Sync all but revolutionized the speed of ecommerce assortment synchronization for Shopify merchants.
Utilizing Shopify webhooks, all product data is now synchronized, and kept up-to-date, with lightning-fast speeds. This includes changes to prices, products, metafields, and everything in between. Updates take place as soon as the merchant makes a change – with NO requirement for them to manually trigger a sync or wait for the scheduled event. This allows for faster, more efficient synchronization.
Also in 2022, ecommerce platform Shopify released Online Store 2.0. As part of this, Shopify revealed they would also place greater emphasis on metafields - marking that the long-awaited rise of the metafields is imminent (if not already upon us).
Findify developers welcomed this improvement with open arms, as it meant a closer alignment with the way Findify already operated - our infrastructure was already optimized to sync metafields at lightning-fast speeds.
Using metafields instead of, let’s say, tags, also benefits the merchant - in more ways than one. You now have the potential to far more easily create a rich product data catalog, and the ability to more easily populate specific data for front-end display
Ok, but what exactly ARE metafields?
Metafields are data sets that can be attached to products, variants, customers, collections, and other objects in your online store. They enable you to customize the functionality and appearance of your store by letting you save specialized information that isn't captured within Shopify’s default fields.
In many ways, from a user perspective, metafields represent an upgrade of what it was like working with tags - with this updated way of working adding increased granularity, a cleaner data structure, and improved performance. In addition, metafields help overcome the limitation of only being able to work on a product level.
You can use metafields for internal tracking, or to display specialized information on your online store in a variety of ways. You can change the colors of certain CTA buttons, restrict certain products from sale, group and ungroup products in the product grid… and much, much more.
To get really in-depth, check out the list below. Here you’ll find a number of specific use cases we have identified where metafields are making our merchants’ ecommerce lives that much easier.
Some of these use cases require the merchant to set up, and then populate a metafield (or multiple metafields) and then carry out further actions within the Findify merchant dashboard in order to activate. However other use cases require the merchant to set up and populate metafields, and then contact us via [email protected] so that we can activate on your behalf.
Once a metafield has been activated by Findify, the merchant can add the metafields to further products/variants/collections retrospectively, and can also update the data contained in the metafield as needed, without having to contact us a second time.
PRODUCT CARD PRESENTATION: Custom Sticker Creation
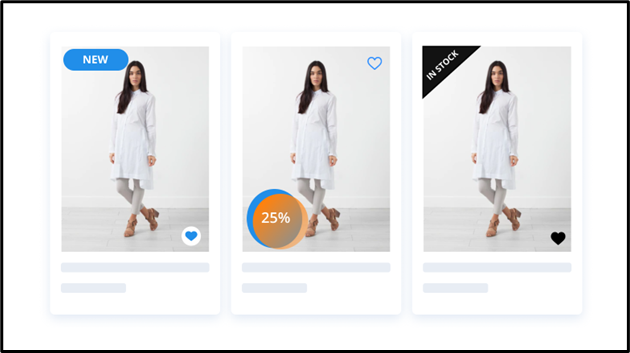
Adding stickers to product cards is a well-established technique to help shoppers make buying decisions, thereby increasing store conversion.
This incredibly powerful ecommerce tool (which is also sometimes referred to as the displaying of product badges, labels, tags, or markers) is utilized by all major shopping portals, including Amazon, Walmart, Etsy, and AliExpress to boost sales.
While there are a number of third-parties offering product sticker services, Findify clients have the additional benefit of sticker creation without the need to download additional apps.
Previously, the creation of customized stickers required the use of some complex tag logic. Now, by using metafields instead of tags, clean and dedicated fields can be used.
With metafields, merchants can fully define styling in e.g. the text, background, and color of the sticker (as well as add any symbol they wish) for desired products.
Step by Step: Custom Stickers using metafields
Creating a metafield:
- Go to your Shopify dashboard.
- In the bottom left corner of the screen, click on ‘Settings’.
- You will now see a list of options along the left hand side of the screen. Click on ‘Metafields’.
- Now select whether you want a product metafield, or a variant metafield. In this case, you would most likely want to choose ‘Product’.
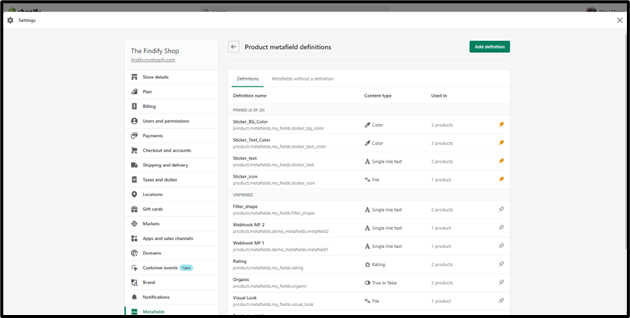
- After you make your selection, you will see a list of all the metafields that have already been created. To create a new one, click ‘Add definition’ (which can be found in the top right of the screen).
- Fill in the appropriate data such as the name of the metafield, and a description of the metafield. Then select the most appropriate field such as ‘Color’, ‘Single line text’, ‘File’, etc. (Note: Merchants must set up individual metafields for each aspect of the sticker that they want to control. For example, background color would be one metafield, sticker text would be another.)
- Click ‘Save’.
Populating your metafield with data:
- Return to your Shopify dashboard.
- In the menu on the left, click ‘Products’.
- Find the product you want, and click on it. On the next screen that appears, scroll to the bottom and you will find a section called ‘Metafields’. The metafield(s) you just created should already be appearing here. (If the metafield relates only to a variant, click on the product, then on the specific variant, then scroll down and you will also see a metafields section.)
- Input the appropriate data, and click ‘Save’.
- The final step is to activate this data in the front-end. The easiest way to do this is to send an email to [email protected] and we will do it for you. Though you can also activate it yourself in the code, if you wish. For more information on that, go here: https://developers.findify.io/docs/findify-react-devtools.
PRODUCT CARD PRESENTATION: Premade Stickers
Following on from the creation of custom stickers (above) merchants can also use metafields to upload more advanced styling.
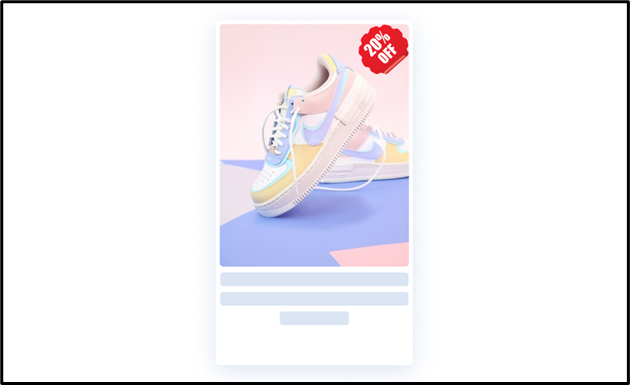
Let’s say, for example, your graphic designer has created one or more sticker designs for your store using Photoshop and has saved it as an svg file (svg recommended for performance). So you don’t want to create a new (relatively basic) sticker, you want to upload one that has a more advanced design. This task can also be easily managed using metafields as you can utilize image files instead of code rendering.
To do this, you would create a metafield within your Shopify dashboard - one that contains files. Then simply upload your premade sticker.
Step by Step: Uploading premade stickers using metafields
Creating a metafield:
- Go to your Shopify dashboard.
- In the bottom left corner of the screen, click on ‘Settings’.
- You will now see a list of options along the left hand side of the screen. Click on ‘Metafields’.
- Now select whether you want a product metafield, or a variant metafield. In this case, you would most likely want to choose ‘Product’.
- After you make your selection, you will see a list of all the metafields that have already been created. To create a new one, click ‘Add definition’ (which can be found in the top right of the screen).
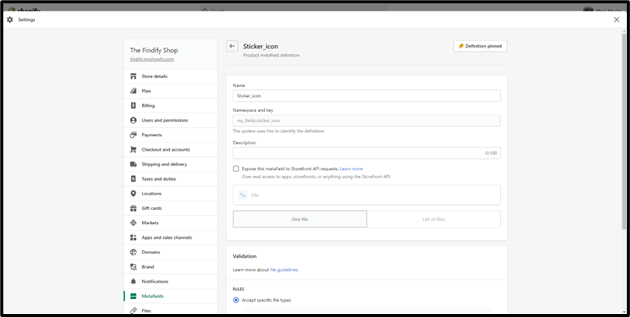
- Fill in the appropriate data such as the name of the metafield, and a description of the metafield. Then select ‘File’.
- Click ‘Save’.
Populating your metafield with data:
- Return to your Shopify dashboard.
- In the menu on the left, click ‘Products’.
- Find the product you want, and click on it. On the next screen that appears, scroll to the bottom and you will find a section called ‘Metafields’. The metafield you just created should already be appearing here. (If the metafield relates only to a variant, click on the product, then on the specific variant, then scroll down and you will also see a metafields section.)
- Using this field you created earlier, upload your premade sticker file and click ‘Save’.
- The final step is to activate this data in the front-end. The easiest way to do this is to send an email to [email protected] and we will do it for you. Though you can also activate it yourself in the code, if you wish. For more information on that, go here: https://developers.findify.io/docs/findify-react-devtools.
PRODUCT CARD PRESENTATION: Base Color or Price
The better customers understand your product`s characteristics, the more open they are to purchasing it. As such, an empty, or poorly compiled, product card can neither catch a customer's attention nor earn their trust.
This is why merchants need to think carefully not only about product card design, such as including custom stickers or enabling hover images (more on that later), but also about what textual information is included.
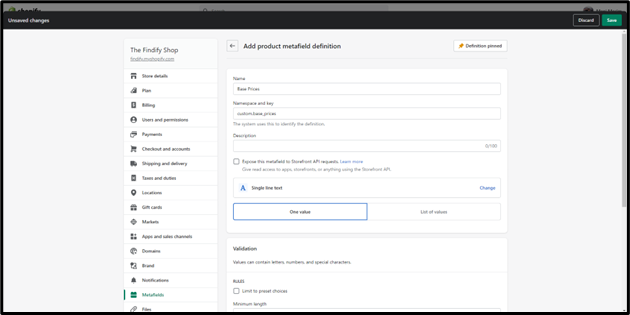
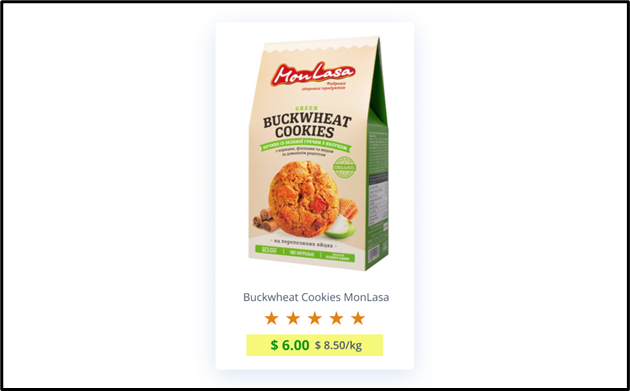
Let’s say, for example, a product has a base color, or a base price. You can, if you choose, display this information on each product card.
If a merchant is selling candles at a price of €0.99, you might also want to display underneath how much this equates to in terms of weight (€1.79 per 100g). This type of information can be easily managed through metafields.
Step by Step: Display base prices using metafields
Creating a metafield:
- Go to your Shopify dashboard.
- In the bottom left corner of the screen, click on ‘Settings’.
- You will now see a list of options along the left hand side of the screen. Click on ‘Metafields’.
- Now select whether you want a product metafield, or a variant metafield. In this case, you would most likely want to choose ‘Product’.
- After you make your selection, you will see a list of all the metafields that have already been created. To create a new one, click ‘Add definition’ (which can be found in the top right of the screen).
- Fill in the appropriate data such as the name of the metafield, and a description of the metafield. Then select ‘Single Line Text’.
- Click ‘Save’.
Populating your metafield with data:
- Return to your Shopify dashboard.
- In the menu on the left, click ‘Products’.
- Find the product you want, and click on it. On the next screen that appears, scroll to the bottom and you will find a section called ‘Metafields’. The metafield you just created should already be appearing here. (If the metafield relates only to a variant, click on the product, then on the specific variant, then scroll down and you will also see a metafields section here.)
- Input the base price and click ‘Save’.
- The final step is to activate this data in the front-end. The easiest way to do this is to send an email to [email protected] and we will do it for you. Though you can also activate it yourself in the code, if you wish. For more information on that, go here: https://developers.findify.io/docs/findify-react-devtools.
PRODUCT CARD PRESENTATION: Subtitles
The better customers understand your product`s characteristics, the more open they are to purchasing it.
As outlined above, it’s important that your customers understand your products characteristics - and so the information you include on your product card is key.
ANY additional information you want to include on your product cards, that isn’t supported by your platform, can be added and managed using metafields.
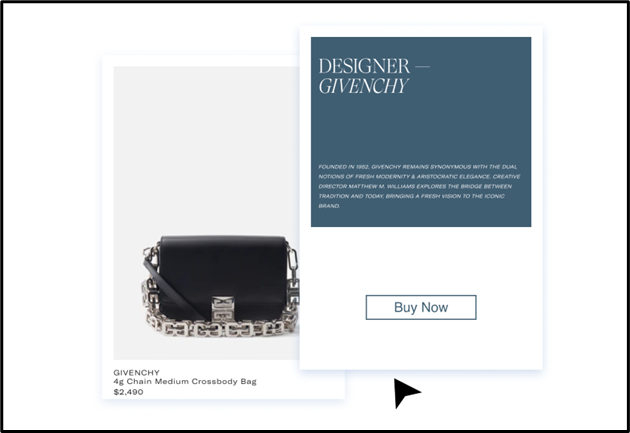
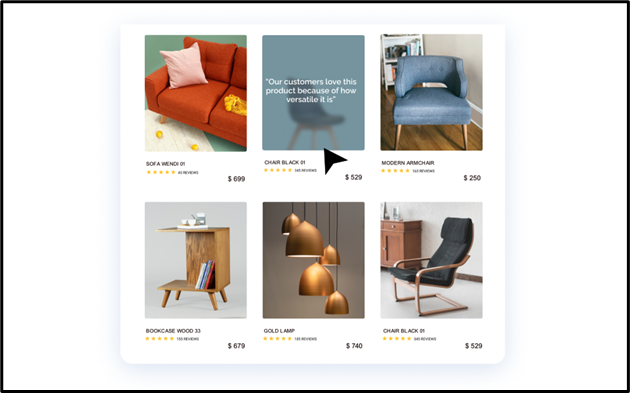
You can, for example, choose to include completely custom messaging that appears on a per product basis - if you are a clothing store, you might want to add stylist notes on certain items which appear to the customer upon hovering over it with their cursor.
Step by Step: Create product subtitles using metafields
Creating a metafield:
- Go to your Shopify dashboard.
- In the bottom left corner of the screen, click on ‘Settings’.
- You will now see a list of options along the left hand side of the screen. Click on ‘Metafields’.
- Now select whether you want a product metafield, or a variant metafield. In this case, you would most likely want to choose ‘Product’.
- After you make your selection, you will see a list of all the metafields that have already been created. To create a new one, click ‘Add definition’ (which can be found in the top right of the screen).
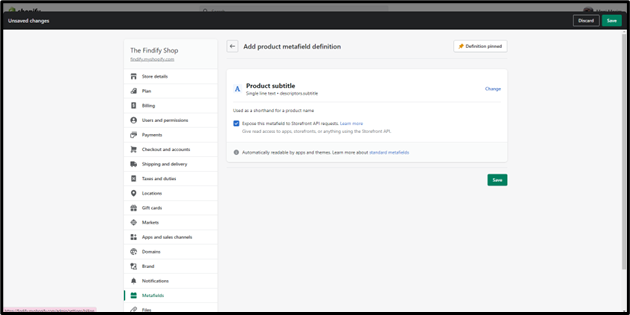
- Start typing ‘Product Subtitle’ in the name field, then click on the ‘Suggested Standard Definition’ that comes up.
- Click ‘Save’.
Populating your metafield with data:
- Return to your Shopify dashboard.
- In the menu on the left, click ‘Products’.
- Find the product you want, and click on it. On the next screen that appears, scroll to the bottom and you will find a section called ‘Metafields’. The metafield you just created should already be appearing here.
- Input your desired product subtitle and click ‘Save’.
- The final step is to activate this data in the front-end. The easiest way to do this is to send an email to [email protected] and we will do it for you. Though you can also activate it yourself in the code, if you wish. For more information on that, go here: https://developers.findify.io/docs/findify-react-devtools.
PRODUCT CARD PRESENTATION: Hover Images
Once considered a novelty, the hover effect has become an integral part of ecommerce website design - designers having recognized the effectiveness of this special effect in capturing user attention, and engaging them to the point where conversions noticeably improve.
In addition to attracting user attention, hover effects can provide a variety of benefits by providing instant information or serving as navigation aids, with fewer clicks. Merchants benefit by the way hover effects can be employed to steer users to calls to action, shopping carts, wish lists, and more.
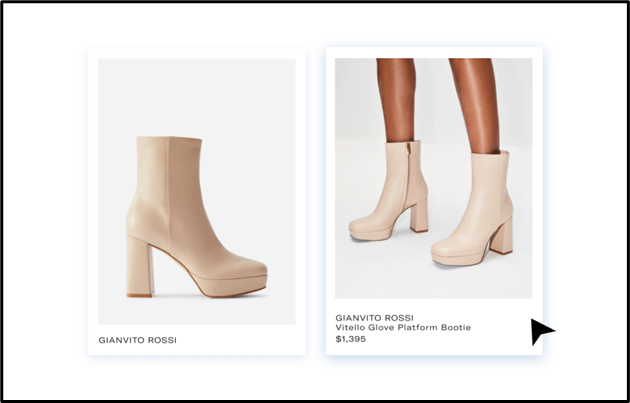
Using metafields, you can enable a secondary image to be shown upon hovering over the main image of a product card.
Step by Step: Hover Images using metafields
Creating a metafield:
- Go to your Shopify dashboard.
- In the bottom left corner of the screen, click on ‘Settings’.
- You will now see a list of options along the left hand side of the screen. Click on ‘Metafields’.
- Now select whether you want a product metafield, or a variant metafield. In this case, you would most likely want to choose ‘Product’.
- After you make your selection, you will see a list of all the metafields that have already been created. To create a new one, click ‘Add definition’ (which can be found in the top right of the screen).
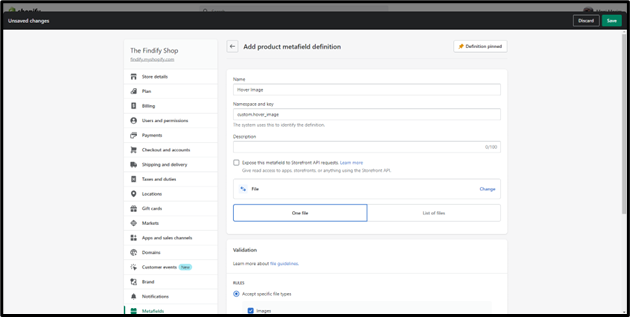
- Add whatever name you desire - e.g. ‘Hover Image’.
- Under ‘Select content type’, select ‘File’.
- Click ‘Save’.
Populating your metafield with data:
- Return to your Shopify dashboard.
- In the menu on the left, click ‘Products’.
- Find the product you want, and click on it. On the next screen that appears, scroll to the bottom and you will find a section called ‘Metafields’. The metafield you just created should already be appearing here.
- Add desired image.
- Click ‘Save’.
- The final step is to activate this data in the front-end. The easiest way to do this is to send an email to [email protected] and we will do it for you. Though you can also activate it yourself in the code, if you wish. For more information on that, go here: https://developers.findify.io/docs/findify-react-devtools.
PRODUCT CARD PRESENTATION: Button Color
There are more ecommerce websites online today than ever before - which is why branding is essential to any online store.
You don't just want customers to use your business once - you want to create customers who continue to come back. With good branding, you can give your brand a more human side, which your customers can relate to more than a company that's strictly all business.
As such, merchants need full control over every aspect of their store’s look and feel - they need the ability to fully tailor each and every solution to their brand.
With Findify, this is not a problem. All our solutions are fully customizable. Extensive customizations can be carried out either by the store’s in-house developers (if present) or by Findify developer. Smaller customization can, with the help of metafields, be carried out by the merchant via the Shopify dashboard.
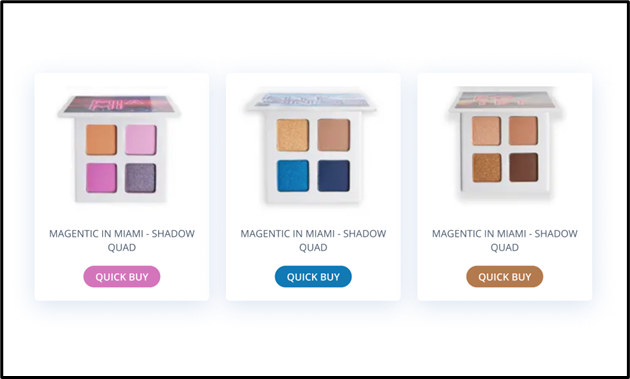
Take CTAs, for example. Merchants can now utilize the power of metafields to alter the color of their CTA buttons - making them all the same color, or making them all different colors.
While this may seem like a small feature, changing your CTA colors to give them more contrast against your homepage or product page colors creates more visibility, leading to higher conversions. It also allows you to ensure they are in keeping with your brand guidelines.
Step by Step: Changing button colors using metafields
Creating a metafield:
- Go to your Shopify dashboard.
- In the bottom left corner of the screen, click on ‘Settings’.
- You will now see a list of options along the left hand side of the screen. Click on ‘Metafields’.
- Now select whether you want a product metafield, a variant metafield, or a collection metafield (should you want to apply this to all products within one collection). In this case, you would most likely want to choose ‘Product’.
- After you make your selection, you will see a list of all the metafields that have already been created. To create a new one, click ‘Add definition’ (which can be found in the top right of the screen).
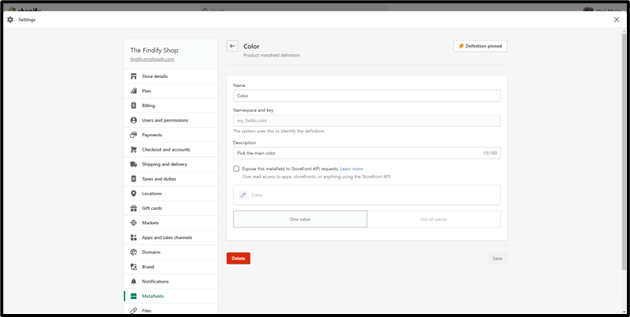
- Fill in the appropriate data such as the name of the metafield, and a description of the metafield. Then select ‘Color’.
- Click ‘Save’.
Populating your metafield with data:
- Return to your Shopify dashboard.
- In the menu on the left, click ‘Products’.
- Find the product you want, and click on it. On the next screen that appears, scroll to the bottom and you will find a section called ‘Metafields’. The metafield you just created should already be appearing here. (If the metafield relates only to a variant, click on the product, then on the specific variant, then scroll down and you will also see a metafields section.)
- Using the field you created earlier, select the color you want.
- Click ‘Save’.
- The final step is to activate this data in the front-end. The easiest way to do this is to send an email to [email protected] and we will do it for you. Though you can also activate it yourself in the code, if you wish. For more information on that, go here: https://developers.findify.io/docs/findify-react-devtools.
PRODUCT CARD PRESENTATION: Hover messages
For certain stores, it makes sense to try and connect more with your shoppers. One way to do this is by including messages to them throughout your store.
Let’s say, for example, you’re selling books and you want to tell your shoppers which ones your staff members particularly loved.
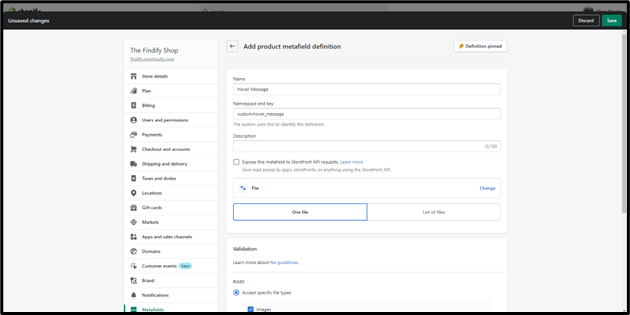
Yes, you could simply create a ‘Staff Favorite’ sticker, but you can also go a bit more in depth with a pop up message. Think Hover Image, except with text instead of a picture.
Step by Step: Generate hover messages using metafields
Creating a metafield:
- Go to your Shopify dashboard.
- In the bottom left corner of the screen, click on ‘Settings’.
- You will now see a list of options along the left hand side of the screen. Click on ‘Metafields’.
- Now select whether you want a product metafield, a variant metafield, or a collection metafield. In this case, you would most likely want to choose ‘Product’.
- After you make your selection, you will see a list of all the metafields that have already been created. To create a new one, click ‘Add definition’ (which can be found in the top right of the screen).
- Fill in the appropriate data such as the name of the metafield, and a description of the metafield. Then select ‘Single Line Text’.
- Click ‘Save’.
Populating your metafield with data:
- Return to your Shopify dashboard.
- In the menu on the left, click ‘Products’.
- Find the product you want, and click on it. On the next screen that appears, scroll to the bottom and you will find a section called ‘Metafields’. The metafield you just created should already be appearing here. (If the metafield relates only to a variant, click on the product, then on the specific variant, then scroll down and you will also see a metafields section.)
- Using the field you created earlier, populate the desired text.
- Click ‘Save’.
- The final step is to activate this data in the front-end. The easiest way to do this is to send an email to [email protected] and we will do it for you. Though you can also activate it yourself in the code, if you wish. For more information on that, go here: https://developers.findify.io/docs/findify-react-devtools.
FILTERING & SORTING: Unlimited Filters
With Metafields, merchants can even overcome platform limitations.
Shopify, for example, allows merchants to enable up to 20 product filter groups based on existing product data, such as price, variant options, availability, category, size, brand, color etc.
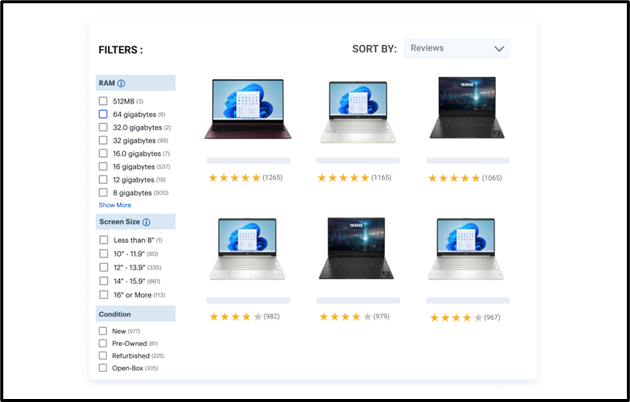
Through the clever use of metafields, merchants can add an unlimited amount of their own custom filter groups - you can literally enable any filter value you need. This is perfect for niche stores and detail-oriented industries such as electronics or furniture.
In an electronics store, for example, a merchant might prefer to enable their customers to filter based on energy rating, screen resolution, and connectivity. In a furniture store, it might be helpful to allow customers to filter based on dimensions such as height, depth, and width.
Did you know?
It's super easy to manage your sorting options (and create new ones!) from directly within your Findify merchant dashboard. For more information on how to do that, click here.
Step by Step: Create custom filters using metafields
Creating a metafield:
- Go to your Shopify dashboard.
- In the bottom left corner of the screen, click on ‘Settings’.
- You will now see a list of options along the left hand side of the screen. Click on ‘Metafields’.
- Now select whether you want a product, variant, or collection metafield.
- After you make your selection, you will see a list of all the metafields that have already been created. To create a new one, click ‘Add definition’ (which can be found in the top right of the screen).
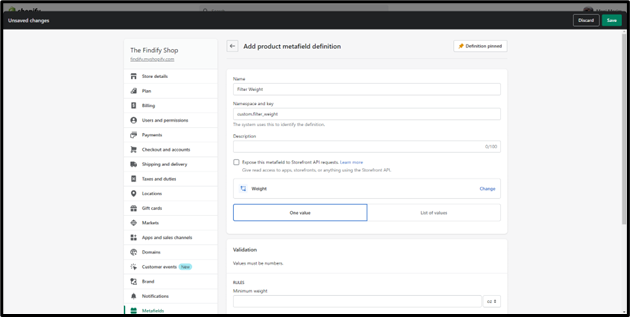
- Fill in the appropriate data such as the name of the metafield, and a description of the metafield.
- For weight, select the pre-built content type ‘Weight’ (see below). For other measurements, such as length, select either the content type ‘Integer’ or ‘Decimal’ (if wanting to show decimals). It might also be appropriate to select ‘Volume’ or ‘Dimension’, depending on the custom option you want to create.
- Click ‘Save’.
Populating your metafield with data:
- Return to your Shopify dashboard.
- In the menu on the left, click ‘Products’ (or ‘Products’ and then ‘Collections’).
- Find the product or collection you want, and click on it. On the next screen that appears, scroll to the bottom and you will find a section called ‘Metafields’. The metafield you just created should already be appearing here.
- Using the field you created earlier, either populate the appropriate data or import it from your PIM or business system.
- Click ‘Save’.
- The final step is to activate this data in the front-end. Just send an email to [email protected] and we will do it for you.
FILTERING & SORTING: Custom Sorting
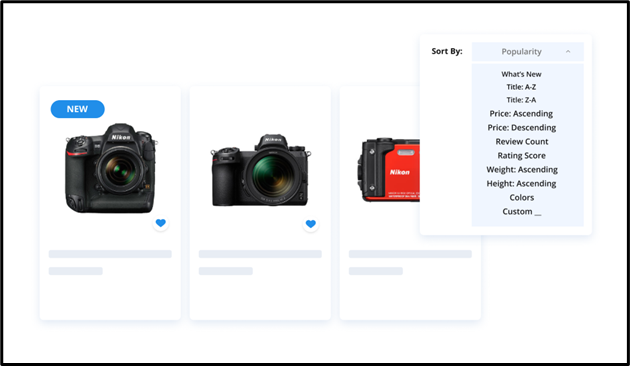
Similar to adding custom filters (see above), some merchants in specific industries might also benefit from adding custom sorting options to their search results page.
In a typical ecommerce store, you might find sorting options such as ‘New Arrivals’, ‘Price: High to Low’, ‘Price: Low to High’, ‘Featured’ etc.
If you’re a merchant in the electronics industry, however, or in industries such as home improvement, outdoor gear etc, your shoppers might be better served by more custom sorting options such as sort by ‘Screw Length’, ‘Energy Rating’, ‘Weight’ etc.
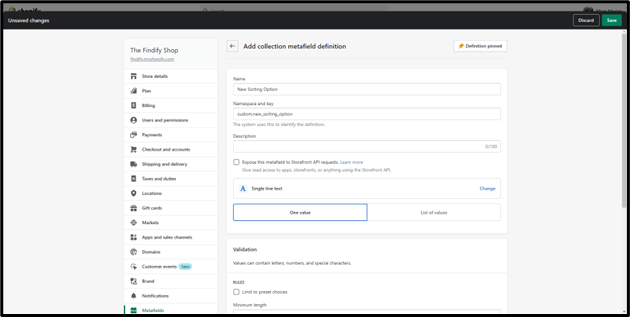
These options can be created and managed cleanly and easily from the Shopify dashboard using metafields.
Step by Step: Custom Sorting using metafields
Creating a metafield:
- Go to your Shopify dashboard.
- In the bottom left corner of the screen, click on ‘Settings’.
- You will now see a list of options along the left hand side of the screen. Click on ‘Metafields’.
- Now select whether you want a product metafield, or a variant metafield.
- After you make your selection, you will see a list of all the metafields that have already been created. To create a new one, click ‘Add definition’ (which can be found in the top right of the screen).
- Fill in the appropriate data such as the name of the metafield, and a description of the metafield. Select the content type ‘Single Line Text’
- Click ‘Save’.
Populating your metafield with data:
- Return to your Shopify dashboard.
- In the menu on the left, click either ‘Products’ or ‘Products’ and then ‘Collections’.
- Find the product or collection you want, and click on it. On the next screen that appears, scroll to the bottom and you will find a section called ‘Metafields’. The metafield you just created should already be appearing here.
- Using the field you created earlier, populate the appropriate data (note: each metafield represents a different sorting option. If you want to create three new sorting options, you will have to create three new metafields).
- Click ‘Save’.
- The final step is to activate this data in the front-end. Just send an email to [email protected] and we will do it for you.
MERCHANDISING
Ecommerce merchandising is both a science and an art. Its goal is to boost sales by connecting shoppers with the right products.
As such, strategic merchandising is key. But merchants not only need to sit down and work out their merchandising goals - they also need the right tools to implement their chosen strategies.
With Findify, merchants have a wide range of merchandising tools at their disposal (for more on that, click here) but we also encourage and enable the use of custom logics.
As an initial example, let’s say you are a fashion retailer and you want to boost a variant of a product based on information that is already established as a field - such as color, or size. You can achieve this easily using Findify’s pre-existing merchandising tools.
But perhaps you would also like to boost a product variant based on a field that is not yet established. This is also possible now, by using metafields data.
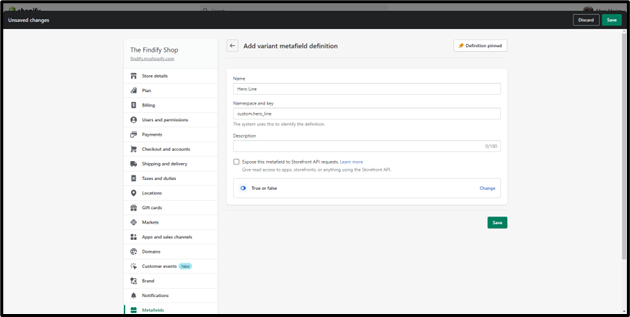
Let’s say I have some key products I want to push - however they don’t all share common attributes that I can use as a boosting rule. In this case, I would create a new metafield, calling it something like ‘Hero Line’ or ‘Hero Products’ or whatever makes most sense for you and your store.
I would then mark all the desired products as being part of this Hero Line, and then boost based on that.
Step by Step: Merchandising using metafields
Creating a metafield:
- Go to your Shopify dashboard.
- In the bottom left corner of the screen, click on ‘Settings’.
- You will now see a list of options along the left hand side of the screen. Click on ‘Metafields’.
- Now select a variant metafield.
- After you make your selection, you will see a list of all the metafields that have already been created. To create a new one, click ‘Add definition’ (which can be found in the top right of the screen).
- Fill in the appropriate data such as the name of the metafield (‘Hero’, for example), and a description of the metafield. Select ‘True or False’ as the content type.
- Click ‘Save’.
Populating your metafield with data:
- Return to your Shopify dashboard.
- In the menu on the left, click ‘Products’.
- Find the product you want, scroll down the specific variant, and click ‘edit’. On the next screen that appears, scroll to the bottom and you will find a section called ‘Metafields’. The metafield you just created should already be appearing here.
- Using the field you created earlier, mark the variant as part of the Hero line.
- Click ‘Save’.
Boosting the Hero line:
- Return to your Findify dashboard (https://dashboard.findify.io/).
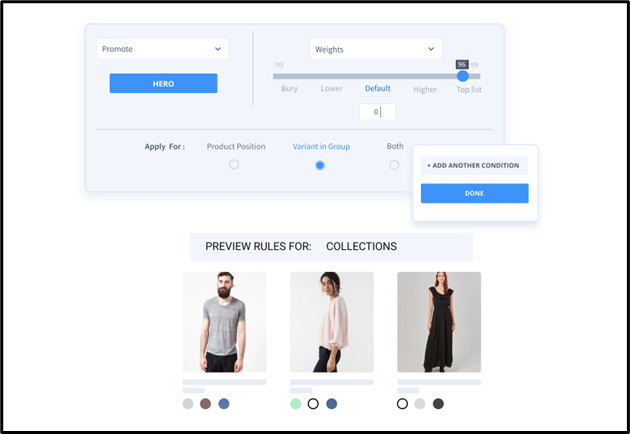
- Go to Smart Collections → Merchandising Rules. (You can also boost within search results, if desired, though you will most likely only want to boost within collections.)
- Click on ‘Create New’.
- Choose a name for the rule, which is only shown internally.
- Select which collection(s) you want the rule to apply to.
- Choose ‘Promote’, then select the Hero line (or whatever you have titled it). You can choose to apply the rule on either a product or a variant level.
GROUPING: Swatches
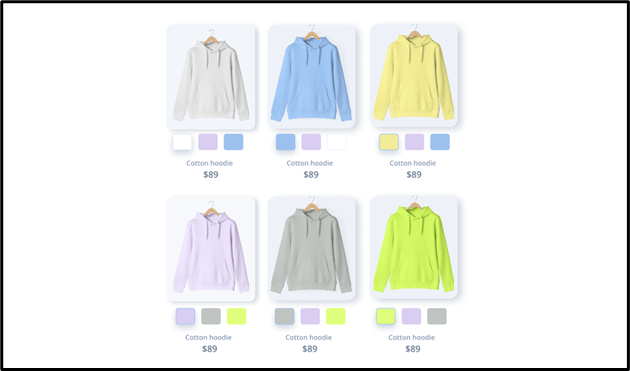
Color swatches enable customers to see the different colors a product is available in.
As you are no doubt already aware, shoppers can even search using the listed color swatches as a filtering option, ensuring their search for ‘dresses’, for example, only returns results for items matching their selected swatches: let’s say red, multicolor, and leopard print.
If your product is set up within Shopify as one product with multiple variants, adding swatches is super easy. Read More
It is, however, quite complicated to add swatches when a merchant set up different variants of their product as separate products within Shopify.
Let’s say you have a pair of trousers in both black and white, but both have been set up as different products within Shopify. You will run into complications later on if you decide you want shoppers to be able to toggle between the black and white variants on the same product page.
These complications were quite severe, previously, but have been eased somewhat thanks to the introduction of metafields. While still an advanced action, it can now be achieved in a cleaner and easier fashion than previously.
Step by Step: Managing swatches using metafields
Creating a metafield:
- Go to your Shopify dashboard.
- In the bottom left corner of the screen, click on ‘Settings’.
- You will now see a list of options along the left hand side of the screen. Click on ‘Metafields’.
- Select product metafield.
- Now you will see a list of all the metafields that have already been created. To create a new one, click ‘Add definition’ (which can be found in the top right of the screen).
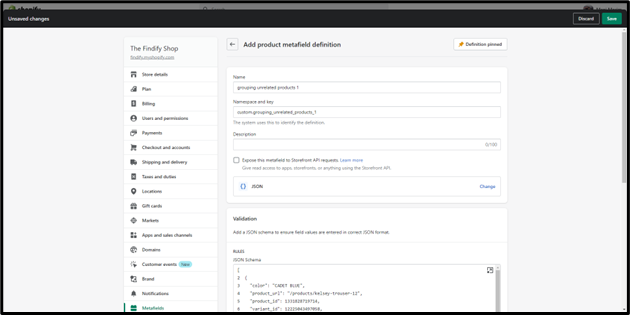
- Fill in the appropriate data such as the name of the metafield, and a description of the metafield. Select the content type ‘JSON’. Then, under JSON Schema, enter the relevant schema.
- Click ‘Save’.
The schema you enter should look like this, but with your own data:
[
2  {
3    "color": "CADET BLUE",
4    "product_url": "/products/kelsey-trouser-12",
5    "product_id": 1331828719714,
6    "variant_id": 12225043497058,
7    "variant_img_url": "https://cdn.shopify.com/s/files/1/1865/0565/products/LM5084M42-CADET-BLUE-SF-5.jpg?v=1583257082",
8    "variant_img_url_2": "https://cdn.shopify.com/s/files/1/1865/0565/products/LM5084M42-CADET-BLUE-LS-5.jpg?v=1583257109",
9    "tag": "color"
10  },
11  {
12    "color": "BLACK",
13    "product_url": "/products/kelsey-trouser-14",
14    "product_id": 1332720959586,
15    "variant_id": 12232299839586,
16    "variant_img_url": "https://cdn.shopify.com/s/files/1/1865/0565/products/LM5084M42_BLACK_F-WEB_8a015a27-5ffe-48b2-8bfd-d411660e8fd0.jpg?v=1623110637",
17    "variant_img_url_2": "https://cdn.shopify.com/s/files/1/1865/0565/products/LM5084M42-BLACK-LS.jpg?v=1623110628",
18    "tag": "color"
19  }
]
Populating your metafield with data:
- Return to your Shopify dashboard.
- In the menu on the left, click ‘Products’.
- Find the product you want, and click on it. On the next screen that appears, scroll to the bottom and you will find a section called ‘Metafields’. The metafield you just created should already be appearing here.
- Using the field you created earlier, populate the appropriate data - marking the products you want to group.
- Click ‘Save’.
- The final step is to activate this data in the front-end. The easiest way to do this is to send an email to [email protected] and we will do it for you. Though you can also activate it yourself in the code, if you wish. For more information on that, go here: https://developers.findify.io/docs/findify-react-devtools.
GROUPING: Ungrouping
As discussed earlier in this article (when we spoke about creating unlimited filtering options), metafields can come in very useful when you want to overcome platform limitations.
This time we’re talking about custom ungrouping within the Shopify platform.
Custom grouping (see above) is when you want to keep your products separate within Shopify, but to have them combined into one product card within the storefront.
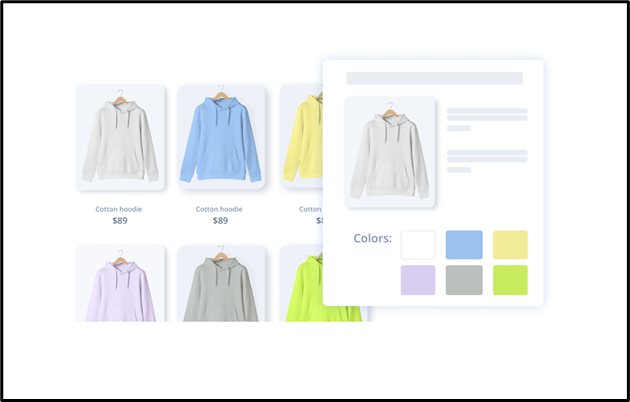
Ungrouping, then, is when you want to have just one product in Shopify which contains all variants such as different sizes and colors, but you want to show multiple product cards within the storefront.
So let’s say, for example, you have a V-neck dress in red and black, and each comes in a size M, and L. You want one product in Shopify that encompasses all colors and variants, but within the product grid you want to show shoppers two different product cards: the red V-neck dress in M, and L as one product, and the black V-neck dress in M and L as another product.
This can be achieved using the winning combination of Shopify metafields plus Findify Search and Merchandising.
Step by Step: Ungrouping using metafields
Creating a metafield:
- Go to your Shopify dashboard.
- In the bottom left corner of the screen, click on ‘Settings’.
- You will now see a list of options along the left hand side of the screen. Click on ‘Metafields’.
- Select product metafield.
- You will next see a list of all the metafields that have already been created. To create a new one, click ‘Add definition’ (which can be found in the top right of the screen).
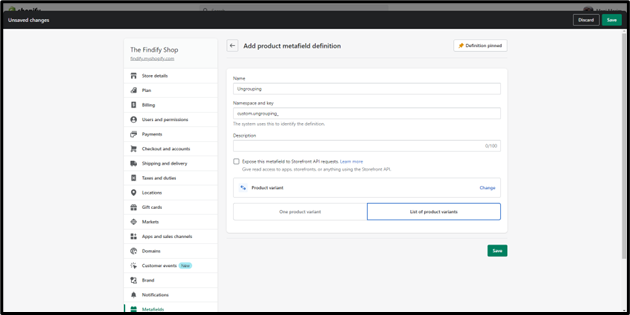
- Fill in the appropriate data such as the name of the metafield, and a description of the metafield. Choose the content type Product Variant (you can select either one product variant, or a list of product variants).
- Click ‘Save’.
Populating your metafield with data:
- Return to your Shopify dashboard.
- In the menu on the left, click ‘Products’.
- Find the product or collection you want, and click on it. On the next screen that appears, scroll to the bottom and you will find a section called ‘Metafields’. The metafield you just created should already be appearing here.
- Using the field you created earlier, populate the appropriate data - marking the variants you want to ungroup.
- Click ‘Save’.
- The final step is to activate this data in the front-end. The easiest way to do this is to send an email to [email protected] and we will do it for you. Though you can also activate it yourself in the code, if you wish. For more information on that, go here: https://developers.findify.io/docs/findify-react-devtools.
INTEGRATIONS
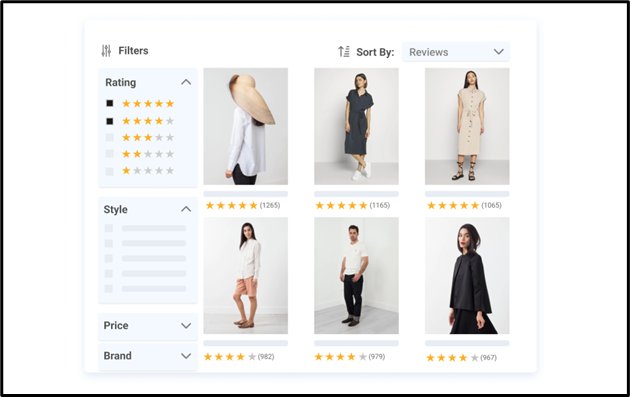
While metafields can undoubtedly be invaluable when managing product cards and filtering and sorting options, they can also be helpful in terms of managing third-party integrations - such as reviews services.
Using this method, you can integrate additional product data.
Take, for example, Judge.me. This service is already set up to send information about reviews via metafields - which essentially acts like an API integration.
Step by Step: Managing integrations using metafields
Creating a metafield:
- Go to your Shopify dashboard.
- In the bottom left corner of the screen, click on ‘Settings’.
- You will now see a list of options along the left hand side of the screen. Click on ‘Metafields’.
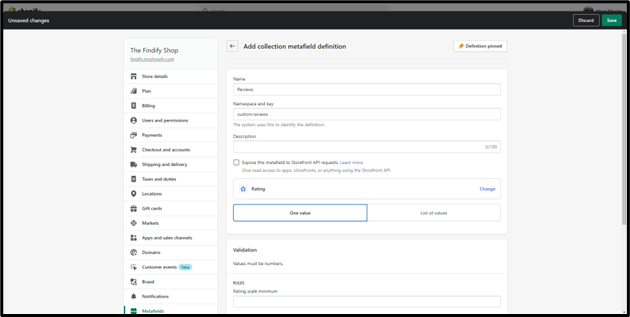
- Now select whether you want a product or collection metafield.
- After you make your selection, you will see a list of all the metafields that have already been created. To create a new one, click ‘Add definition’ (which can be found in the top right of the screen).
- Fill in the appropriate data such as the name of the metafield, and a description of the metafield. The content type you need to select depends on the third party app you want to work with. However, you might want to select the content type ‘Rating’ if it relates to a reviews service. In other cases you might want to select ‘Integer’, ‘Single line text’, ‘Color’, or others, depending on what data you want to use.
- Click ‘Save’.
Populating your metafield with data:
- Return to your Shopify dashboard.
- In the menu on the left, click either ‘Products’ or ‘Products’ and then ‘Collections’.
- Find the product or collection you want, and click on it. On the next screen that appears, scroll to the bottom and you will find a section called ‘Metafields’. The metafield(s) you just created should already be appearing here.
- Input the appropriate data, and click ‘Save’.
- The final step is to activate this data in the front-end. The easiest way to do this is to send an email to [email protected] and we will do it for you. Though you can also activate it yourself in the code, if you wish. For more information on that, go here: https://developers.findify.io/docs/findify-react-devtools
CUSTOMER SEGMENTATION
Last, but by no means least, metafields can also be used to segment customer groups. Merchants may want to do this for a number of reasons, including offering different prices to different groups of customers.
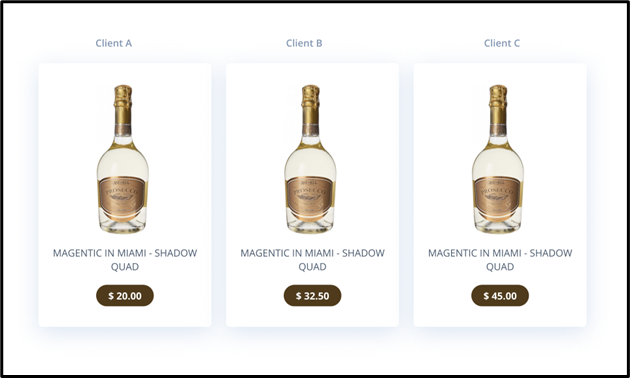
Let’s say, for example, a merchant is selling wine to individuals in Canada, to subscribing members in Canada, and to individuals in a neighboring country. The merchant wants to offer the wine at three different prices - a more expensive price for the wine it has to send out of the country, a base price, and also a discounted price for those who have signed up for membership.
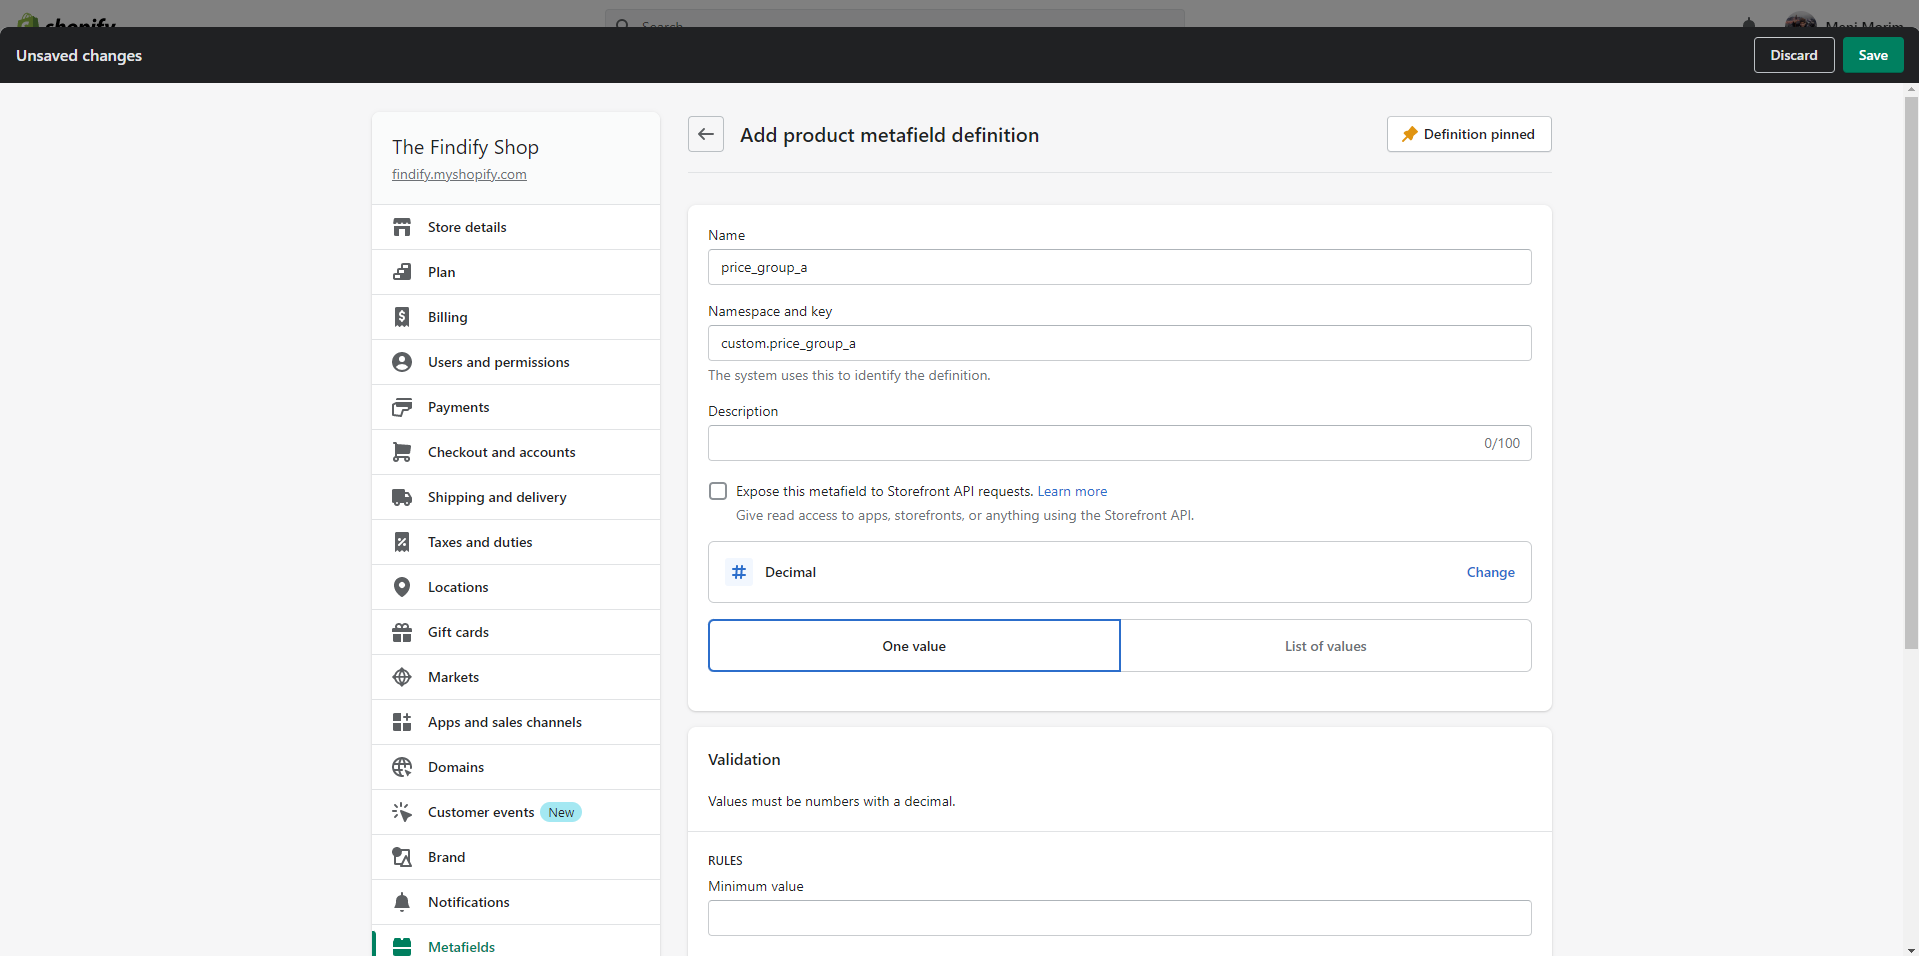
Metafields can help to segment these customer groups, so that all three see three different prices when viewing the exact same product online. (Note: Each price group needs to be a separate metafield, i.e. price_group_a, price_group_b etc.)
Step by Step: Customer Segmentation using metafields
Creating a metafield:
- Go to your Shopify dashboard.
- In the bottom left corner of the screen, click on ‘Settings’.
- You will now see a list of options along the left hand side of the screen. Click on ‘Metafields’.
- Now select whether you want a product or a variant metafield.
- After you make your selection, you will see a list of all the metafields that have already been created. To create a new one, click ‘Add definition’ (which can be found in the top right of the screen).
- Fill in the appropriate data such as the name of the metafield, and a description of the metafield. Select the content type ‘Decimal’.
- Click ‘Save’.
Populating your metafield with data:
- Return to your Shopify dashboard.
- In the menu on the left, click ‘Products’.
- Find the product you want, and click on it. On the next screen that appears, scroll to the bottom and you will find a section called ‘Metafields’. The metafield(s) you just created should already be appearing here. (If the metafield relates only to a variant, click on the product, then on the specific variant, then scroll down and you will also see a metafields section.)
- Input the appropriate data, and click ‘Save’.
- The final step is to activate this data in the front-end. The easiest way to do this is to send an email to [email protected] and we will do it for you. Though you can also activate it yourself in the code, if you wish. For more information on that, go here: https://developers.findify.io/docs/findify-react-devtools.
Updated almost 2 years ago
