Filter Control
Findify offers powerful solutions for search, merchandising, and recommendations tailored for ecommerce. This documentation will guide you through integrating and customizing filter controls using Liquid for Shopify, enabling both individual collection control and bulk management through metafields.
Overview
Using filters enhances navigation for shoppers, allowing them to find products more easily. With Findify, you can add filters using Variant Options, Metafields, or Tags. Detailed information is available in the Findify documentation.
Within the Findify Merchant Dashboard, you can:
- Toggle filters on/off
- Change filter names
- Alter the order of filters
Findify's filters are dynamic by default, meaning they only appear if there are values for the current search query or collection. However, you can control the order of filters for individual collections through a simple method that doesn’t require ongoing code changes.
Configuring Filter Order and Visibility
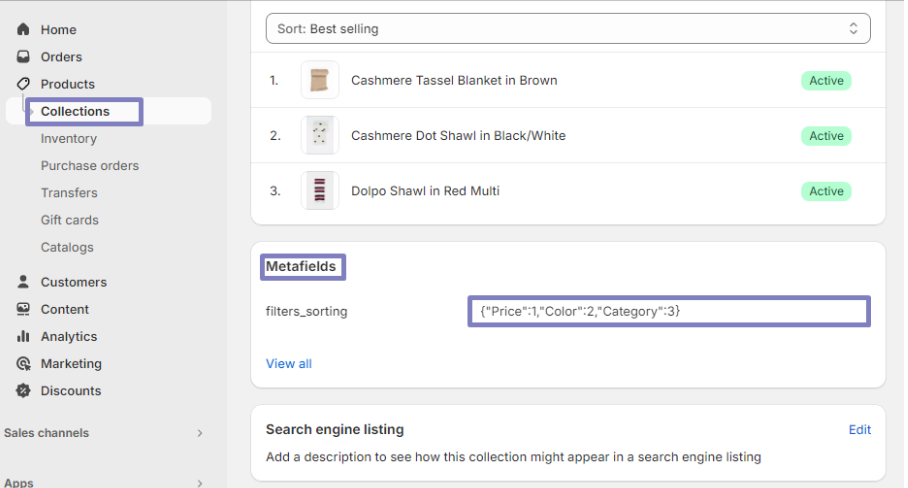
To customize the order of filters displayed for specific collections, use the filters_sorting Shopify metafield. This method allows you to define which filters to include and their display order.
Input Format
Only populate data for collections where you want to alter filter settings. Unpopulated collections will use the default order specified in the Findify dashboard.
Format:
{"Filter Name": Position, "Filter Name_2": Position_2, "Filter Name_n": Position_n}
Example:
{"Price":1,"Color":2,"Category":3}
This configuration will display filters in the following order:
- Price
- Color
- Category
Any filters not listed will be excluded.
Steps to Implement
-
Create
filters_sortingShopify MetafieldNavigate to
Settings > Custom data > Collectionsand create a metafield of typeJSON.

- Add Metafield Value to Collection
Add the metafield value to the specific collection you want to update for filter sorting and visibility.
Example value:
{"Price":1,"Color":2,"Category":3}
- Modify Collection Template in Theme Editor
Open the theme editor and add the following code to your collection template:
<div class="findify-filter-sorting">
  <script>
    {{ collection.metafields.custom["filters_sorting"] }}
  </script>
</div>
- Update
findify-filter-group.js
Add the following code inside the script tag of findify-filter-group.js:
const name = '{{name}}'?.toLowerCase();
const element_id = "{{ element_id }}";
const filterGroupElement = document.getElementById(element_id);
const filters_sorting_json = document.querySelector('.findify-filter-sorting script')?.text;

if (filters_sorting_json) {
  const filters_sorting = JSON.parse(filters_sorting_json);
  const keys = Object.keys(filters_sorting);
  const formattedObject = keys.reduce((acc, key) => {
    const formattedKey = key?.trim()?.toLowerCase();
    acc[formattedKey] = filters_sorting[key];
    return acc;
  }, {});
  const containerBlock = filterGroupElement?.parentNode;
  if (formattedObject[name]) {
    containerBlock.style.order = formattedObject[name];
  } else {
    containerBlock.style.display = 'none';
  }
}
By following these steps, you can effectively manage and customize filter controls for individual collections, enhancing the shopping experience for your customers.
For further assistance or inquiries, feel free to contact us at [email protected].
Updated 11 months ago