Integrating Recommendations
Integrating on your store
There are a view simple steps that you need to do to integrate the widget
-
You need to choose which widget you want to show and where.
We offer home page, product page, cart page and category page widgets, but you can mix and match them and put them wherever you want on the website. -
Enable the widget in the Merchant Dashboard.
As soon as you enable the widget it will become active and will start work and collecting data. -
Add the widget code to the desired location on your website.
The widget code will look like the following code
<div id="home-findify-rec-1"></div>
You should put this code into your store theme where you want it to appear.
That's it, now you are using Findify Recommendations on your store, which will help you increase the customer base and gain more revenue!
Recommendation filtering
Each filter is a rule that is applied to an array of products. Each rule has 5 actions available: pin, exclude, include, push to top, push to bottom. For each action, you define product attribute values that will be used to identify products. Almost all product attributes are available (there are some exceptions like description) as well as custom fields.
If there are multiple filters defined, they are executed in the following order sequentially:
- pin
- exclude
- push to the bottom
- push to the top
- include
After the initial filtering, the products are bucketed into a set of groups for each action in the following order:
- pinned
- pushed to top
- included
- pushed to bottom
Inside of buckets 2-4, the products are sorted according to their search relevancy. Pinned products are sorted according to the pinned order, ignoring their relevancy.
This means that if you define both exclude and include actions, from the resulting array of products, products that fall under exclude action will be removed first and then the ones that fall under include action will be left.
Here are examples of rules that can be applied:
- Include products only from certain brand
- Include products only from certain category
- Exclude products of certain brand
- Exclude products by ID
- Push to top products of certain brand and with quantity > 10 to top
'Current value' integration
When using the current value option, a specific integration needs to be done on the frontend in order to capture the current value of a custom field.
This is done by applying extra tags on the recommendation container, the generic structure looks like this
<div data-findify-filter="FIELD_NAME" data-findify-filter-value="FIELD_VALUE" />
For the FIELD_NAME you need to put the name of the field to filer, e.g. brand, category, custom_fields.width. The value inside data-findify-filter-value tag contains a JSON object in the form of VALUE.
The full example will look similar to this one
<div data-findify-filter="brand" data-findify-filter-value="Adidas" />
Filtering by Brand
The tag for a single brand value is already covered in the Findify Tagging in the Integration Steps.
If you want to add multiple values for brands, you would need to wrap it up with stringified json:
<div data-findify-filter="brand" data-findify-filter-value='[{"value":"addidas"},{value:"nike"},...]'></div>
Let's say that you have a custom field called 'Gender'. You can setup a tag using this custom field as well (make sure that the name of the filter is the same as it is stored internally in Findify):
<div data-findify-filter="custom_fields.Gender" data-findify-filter-value="Men" />
For the category if the current item is part of a nested category, you need to pass multiple items inside the value array
<div data-findify-filter="category" data-findify-filter-value="CategoryParent > CategoryChild" />
Filtering based on Tags-based filters
Example of how to provide values from Shopify tags with a prefix
{% assign typeTags = "" %}

{% for tag in product.tags %}
  {% if tag contains "type:" %}
    {% assign t = tag | remove: "type:" | strip | capitalize %}
    {% assign typeTags = typeTags | append: "," | append: t %}
  {% endif %}
{% endfor %}

{% if typeTags != "" %}
    {% assign splitTypeTags = typeTags | remove_first: "," | split: "," %}
    <div data-findify-filter="TAGS_BASED_FILTER_NAME" data-findify-filter-value='[{% for tag in splitTypeTags %}{"value":"{{ tag }}"}{% if forloop.last == false %},{% endif %}{%endfor%}]'></div>
{% endif %}
Filtering Based on the Variant Options
Example of how to provide values from Shopify variant options
{% assign variantOptions = "" %}

	{% for option in product.options_with_values %}
      {% if option.name == 'VARIANT_OPTION_NAME' %}
		   {% for value in option.values %}
			   {% assign v = value | strip | capitalize %}
			   {% assign variantOptions = variantOptions | append: "," | append: v %}
       {% endfor %}
	  {% endif %}
    {% endfor %}

	{% if variantOptions != "" %}
      {% assign splitVariantOptions = variantOptions | remove_first: "," | split: "," %}
      <div data-findify-filter="VARIANT_OPTION_FIELD" data-findify-filter-value='[{% for value in splitVariantOptions %}{"value":"{{ value }}"}{% if forloop.last == false %},{% endif %}{%endfor%}]'></div>
    {% endif %}
Custom Fields Name
All custom fields in Findify both Tags-Based and Variant Options should have a
custom_field.Variant_Optionorcustom_field.Tags_Based_Filtername.
Integrating and Filtering Using MJS API
Here we will use the MJS API to initialize and filter the Recommendation widget.
You would need to add the container into the Theme Code where you want to render the recommendation, i.e.
<div id="findify-recommendation-container"></div>
Once it is setup, you need to set the script using the MJS API. An example of the solution can be the following:
<script>
      (window.findifyCallbacks = window.findifyCallbacks || []).push(function(findify) {

         //Collect values from Tags for Tags-Based Filters
         {% assign typeTags = "" %}

         {% for tag in product.tags %}
            {% if tag contains "type:" %}
              {% assign t = tag | remove: "type:" | strip | capitalize %}
              {% assign typeTags = typeTags | append: "," | append: t %}
            {% endif %}
          {% endfor %}


         {% if typeTags != "" %}
            {% assign splitTypeTags = typeTags | remove_first: "," | split: "," %}
            var tagsBasedValues = [];
            {% for value in splitTypeTags %}
                  tagsBasedValues.push({"value":"{{ value }}"});
            {%endfor%}
        {% endif %}


         //Collect Variant Options Values
         {% assign variantOptions = "" %}

          {% for option in product.options_with_values %}
              {% if option.name == 'VARIANT_OPTION_NAME' %}
               {% for value in option.values %}
                 {% assign v = value | strip | capitalize %}
                 {% assign variantOptions = variantOptions | append: "," | append: v %}
               {% endfor %}
            {% endif %}
          {% endfor %}

       {% if variantOptions != "" %}
          {% assign splitVariantOptions = variantOptions | remove_first: "," | split: "," %}
          var variantOptionValues = [];
          {% for value in splitVariantOptions %}
             variantOptionValues.push({"value":"{{ value }}"});
          {%endfor%};
       {% endif %}


        //Initialize the Recommendation widget
        //From the above example NODE_TO_INSERT_THE_REC: findify-recommendation-container
        findify.widgets.attach('NODE_TO_INSERT_THE_REC', 'recommendation', {
          slot: 'REC_WIDGET_SLOT_FROM_MD',
          widgetKey: 'UNIQUE_WIDGET_KEY',
          ...findify.config.getIn(['features', 'recommendations', 'REC_WIDGET_SLOT_FROM_MD']).toJS()
        })


        //Use Agents to filter the REC
        findify.widgets.get('UNIQUE_WIDGET_KEY').agent.defaults({
          rules: [{
            type: 'text',
            name: 'custom_fields.TAGS_BASED_FILTER',
            values: tagsBasedValues
          },{
            type: 'text',
            name: 'custom_fields.VARIANT_OPTION_FILTER',
            values: variantOptionValues
          }]
        })

      });
    </script>
An Example of Where to Place Recommendations
Every store has its own unique requirements and, therefore, the structure will differ between themes. This is why we have created a Recommendations solution that can be placed wherever is the best fit for each merchant.
Here is a general example of where Recommendations are most commonly placed.
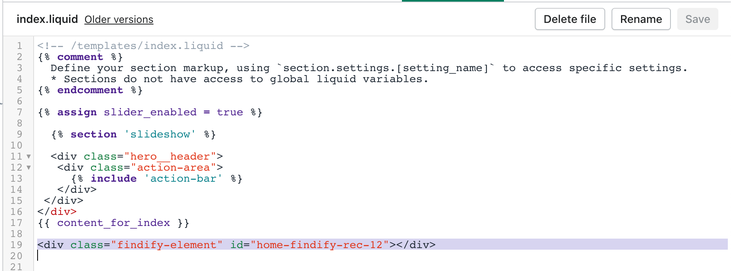
- Home Page
file name: usually index.liquid
In this example, the widget is placed at the very end of the home page:

- Product Page
file: usually product.liquid or product-template.liquid
In this example, the widget is placed at the very end of the product page:

- Cart Page
file: usually cart-template.liquid or cart.liquid
In this example, the recommendation widget will show at the bottom of the cart page:

- Category Page (aka Collection Page)
file: usually collection-template.liquid or collection.liquid
In this example, the category widget would be at the very top of any collection page:

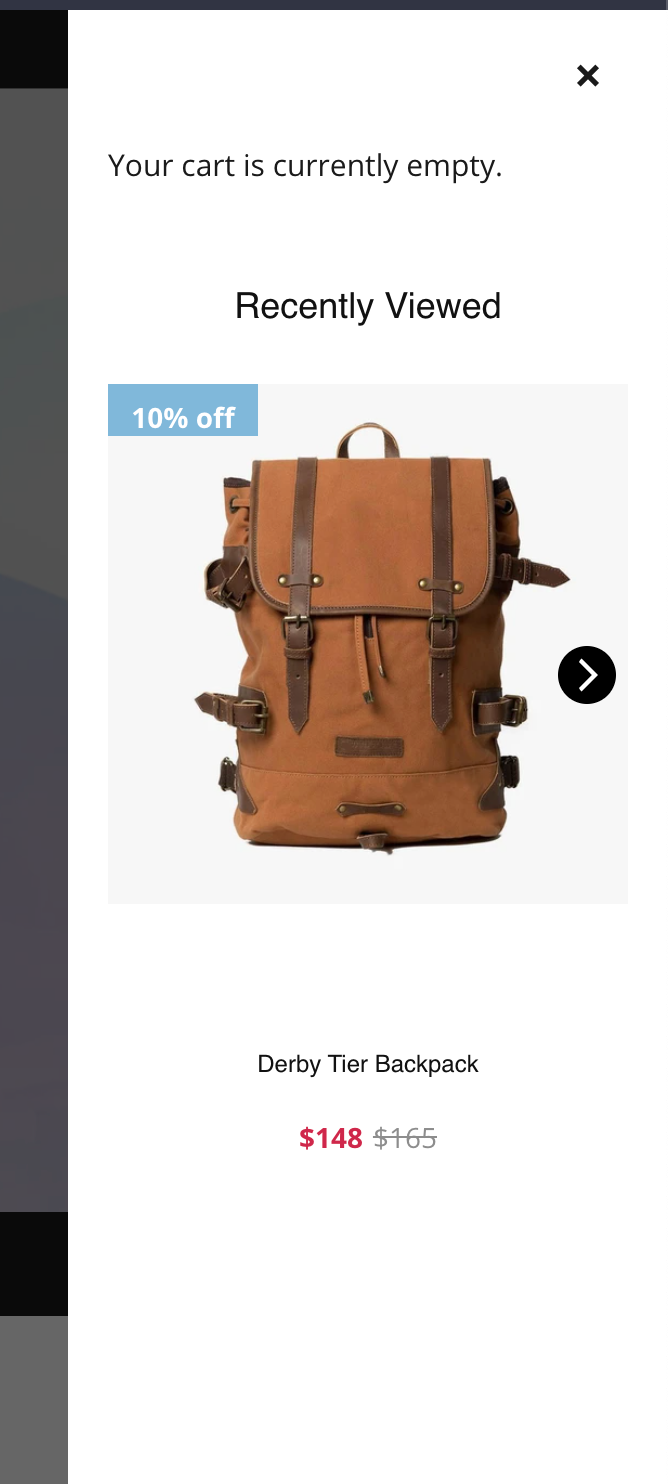
- Custom Page
Use case e.g.: slide-in cart drawer
custom rec widgets can be placed all over the store


Updated almost 2 years ago
