Instagram Integration Setup
Important: This update is driven by Meta (formerly Facebook).
Due to recent platform policy changes, Instagram's Basic Display API is being deprecated and will no longer be available after December 4th, 2024. Meta now restricts integration to business use cases only, meaning that apps can no longer connect to personal Instagram accounts.
Overview
Instagram has sunset its Basic Display API, which previously allowed consumer account integrations. Moving forward, only business and creator Instagram accounts - connected to a verified Facebook Business - can be integrated with third-party platforms like Maropost Merchandising Cloud (formerly Findify).
This documentation walks you through the updated process of connecting an Instagram account to Merchandising Cloud, reflecting Meta's enforced changes.
Prerequisites
Before connecting your Instagram account, please ensure the following:
- Your Instagram account is a Business or Creator account (not Personal).
- It is linked to a verified Facebook Business and associated Facebook Page.
- You have Admin rights to both the Instagram and Facebook Business accounts.
For more on Meta’s policy changes, read the full update here.
How to Connect Your Instagram Account
Follow these steps to set up your Instagram integration within the Merchandising Cloud Dashboard:
- Log into your Maropost Merchandising Cloud account.
- From the left-hand menu, select Content.
- Click the New Integration button.
- In Step 1, under Content Integration Type, choose Instagram.
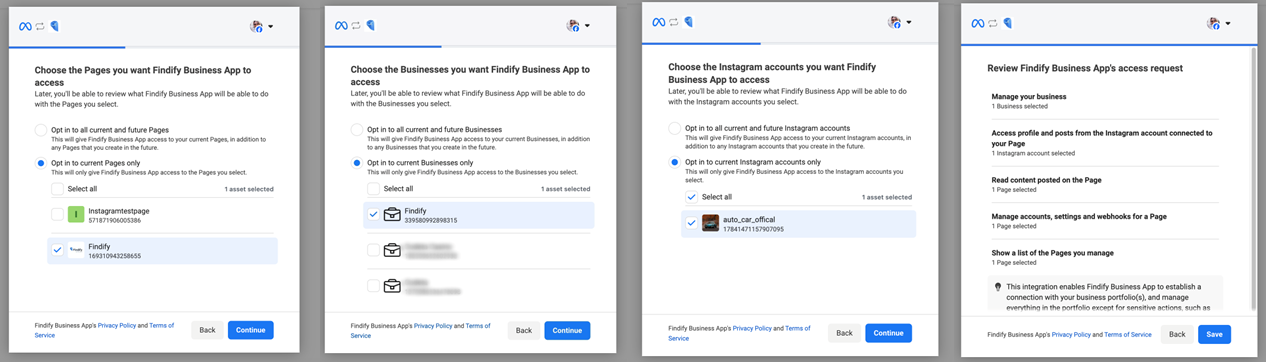
- In Step 2, click Connect Instagram Account. You’ll then be redirected to Instagram’s authorization page.
- Follow the on-screen prompts to authenticate and authorize your business or creator account.
- Once redirected back to the Merchandising Cloud dashboard you can give your integration an internal name. You then need to click Save (top right corner) to confirm and finish the setup.
Updating an Existing Instagram Integration
If you already have an Instagram integration connected and want to switch to a new account, you can easily do this through the Merchandising Cloud dashboard.
Here’s how:
- Each Instagram connection in your Content section is treated as a separate integration.
- If you're an MJS client, you simply need to update the Autocomplete and/or Search Grid settings to point to the new widget associated with your new Instagram integration.
You can find these settings here:
Autocomplete Settings: https://dashboard.findify.io/setup/advanced/autocomplete
Search Grid Settings: https://dashboard.findify.io/setup/advanced/search
If you're using Content Tabs, be sure to update them as well.
Depending on your integration type:
| Integration Type: | What You Need To Do: |
|---|---|
| MJS | Update widget in the settings via the links above. |
| Shopify (Liquid) | Update the widget name in your Liquid template. |
| API | Contact your developer or agency to update the widget name in the code manually. |
Once you've updated the widget references, your new Instagram content will start displaying accordingly.
Troubleshooting
If you're unable to connect or switch accounts:
- Ensure the Instagram account is Business or Creator, not Personal.
- Confirm the account is connected to a verified Facebook Business and Page.
- Make sure you have Admin access.
- Double-check that the correct widget is being referenced in your Autocomplete/Search settings or code.
For further help, contact [email protected].
Updated 3 months ago