How to work with (and bulk edit) Metafields within Shopify
As part of the release of Shopify’s Online Store 2.0, the ecommerce platform revealed a greater emphasis on metafields.
At Findify, we welcomed this development with open arms, as it means closer alignment with the way we already operate - our infrastructure being optimized to sync metafields at lightning-fast speeds.
What is a metafield?
Metafields are data sets that can be attached to products, variants, customers, collections, and other objects in your online store. They enable you to customize the functionality and appearance of your store by letting you save specialized information that isn't captured within Shopify’s default fields.
You can, for example, use metafields for internal tracking, or to display specialized information on your online store in a variety of ways. You can change the colors of certain CTA buttons, restrict certain products from sale, group and ungroup products in the product grid… and much, much more.
How to create a metafield
- Go to your Shopify dashboard.
- In the bottom left corner of the screen, click on ‘Settings’.
- You will now see a list of options along the left hand side of the screen. Click on ‘Metafields’.
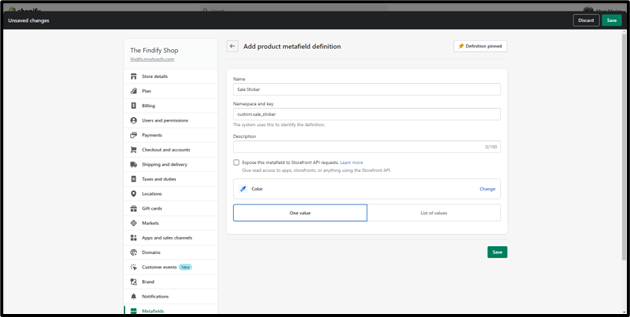
- Now select whether you want a product metafield, a variant metafield, or a collection metafield (should you want to apply the metafield to the collection per se, or for all products within the collection).
- After you make your selection, you will see a list of all the metafields that have already been created. To create a new one, click ‘Add definition’ (which can be found in the top right of the screen).
- Fill in the appropriate data such as the name of the metafield, and a description of the metafield. Then select the most appropriate field such as ‘Color’, ‘Single line text’, ‘File’, etc.
- Click ‘Save’.
How to populate a metafield for a single product
- Go to your Shopify dashboard.
- In the menu on the left, click ‘Products’. Then search for the appropriate product. If your metafield relates to a collection then, in the drop down menu that appears under ‘Products’, click ‘Collections’.
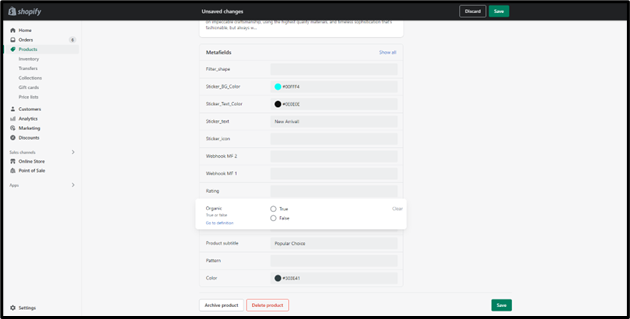
- Find the product or collection you want, and click on it. On the next screen that appears, scroll to the bottom and you will find a section called ‘Metafields’. The metafield you just created should already be appearing here.
- Using the field you created earlier, populate the appropriate data.
- Click ‘Save’.
How to populate a metafield for a single variant
- Go to your Shopify dashboard.
- In the menu on the left, click ‘Products’. Search for the product you want, then click on it.
- On the next screen that appears, scroll down to the section called ‘Variants’.
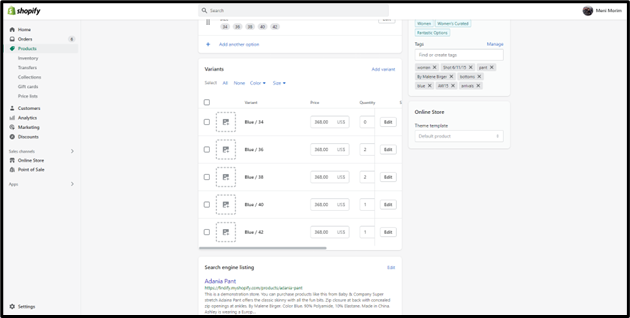
- Click the ‘Edit’ button which is located to the right on the same line as your desired variant.
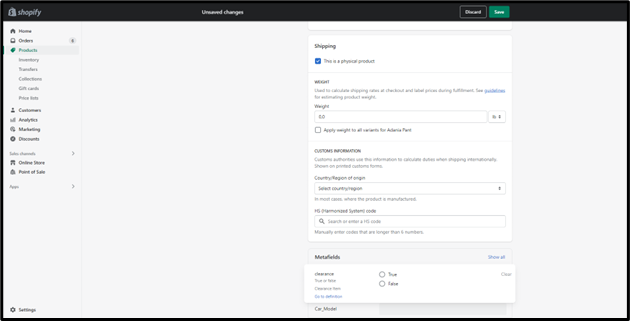
- On the next screen that appears, scroll down to the section titled ‘Metafields’. The metafield you just created should already be appearing here.
- Using the field you created earlier, populate the appropriate data.
- Click ‘Save’.
How to bulk edit product metafields within the Shopify dashboard
One limitation within Shopify, in relation to metafields, is unfortunately the inability to easily access metafields from within Shopify’s bulk editor.
This is an issue because it would be very time consuming to open up individual product pages one after another just to fill out the metafields data - particularly for stores with larger assortments.
Fortunately, there is a workaround. Our tutorial below explains everything you need to do.
Here are the steps in text:
Step One: Locate metafield definition
Before we start, you need the namespace and key of the metafield(s) you want to edit in bulk. To get this info, go to the Metafields definitions page. So, in Shopify, go to Settings and then metafields then products. You’ll see a list of your metafields and their definitions.
A definition should look something like this: metafields.descriptors.subtitle
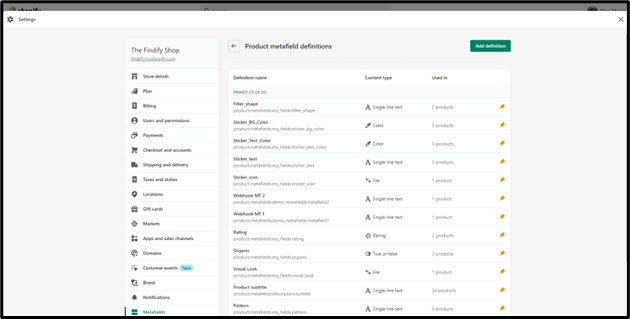
Step Two: Add Namespace and Key to bulk editor URL
Now that we have our definition(s), it’s time to add it/them to the bulk editor URL.
- First, go to your Shopify dashboard.
- Then click Products.
- Then select the items you want to edit. (To select all items in the store, tick the box towards the top left of the screen, then select all products.)
- To open the bulk editor, click ‘Edit Products’.
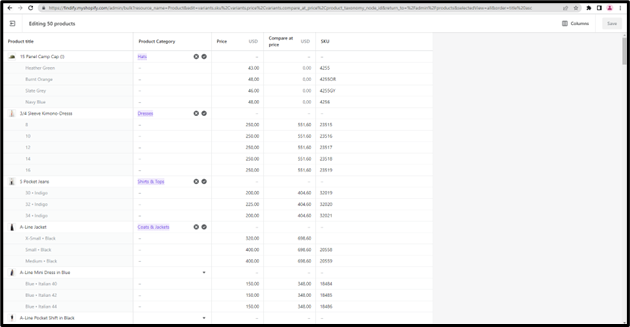
Your URL should now look something like this:
https:// [Your Store's Domain Name] /admin/bulk?resource_name=Product&edit=variants.sku%2Cvariants.price%2Cvariants.compare_at_price%2Cproduct_taxonomy_node_id&return_to=%2Fadmin%2Fproducts&selectedView=all&order=title%20asc
You can see in the URL the fields you’re editing (in this case) are variants.sku, variants.price, and variants.compare at price.
You can also see each field is separated in the URL by three characters: %2C. This is basically just a separator.
So, to access a metafield in the bulk editor, simply add the metafield definition and then %2C before the first field (variants.sku, for example) is listed.
Then hit enter.
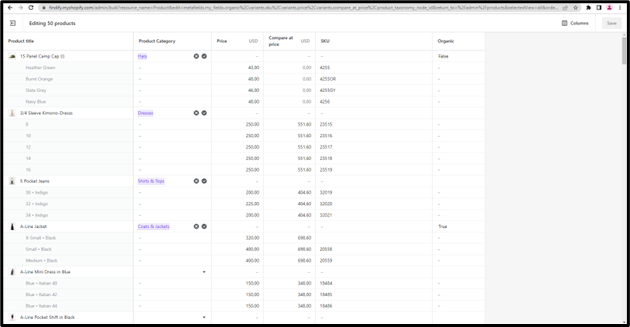
Your URL should now look something like this:
https:// [Your Store's Domain Name] /admin/bulk?resource_name=Product&edit=metafields.my_fields.organic%2Cvariants.sku%2Cvariants.price%2Cvariants.compare_at_price%2Cproduct_taxonomy_node_id&return_to=%2Fadmin%2Fproducts&selectedView=all&order=title%20asc
You can add additional fields, including metafields, should you desire.
How to bulk edit variant metafields within the Shopify dashboard
The above workaround also works for bulk editing variant metafields.
Step One: Locate metafield definition
Before we start, you need the namespace and key of the variant metafield(s) you want to edit in bulk. To get this info, go to the Metafields definitions page. So, in Shopify, go to Settings and then metafields, then variants. You’ll see a list of your metafields and their definitions.
A definition should look something like this: variant.metafields.descriptors.subtitle
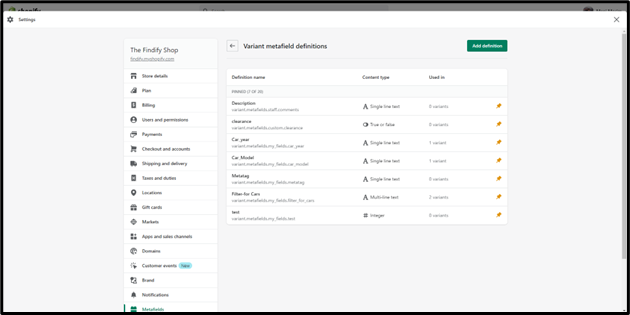
Step Two: Add Namespace and Key to bulk editor URL
Now that we have our definition(s), it’s time to add it/them to the bulk editor URL.
- First, go to your Shopify dashboard.
- Then click Products.
- Then select the items you want to edit. (To select all items in the store, tick the box towards the top left of the screen, then select all products.)
- To open the bulk editor, click ‘Edit Products’.
Your URL should now look something like this:
https:// [Your Store's Domain Name] /admin/bulk?resource_name=Product&edit=variants.sku%2Cvariants.price%2Cvariants.compare_at_price%2Cproduct_taxonomy_node_id&return_to=%2Fadmin%2Fproducts&selectedView=all&order=title%20asc
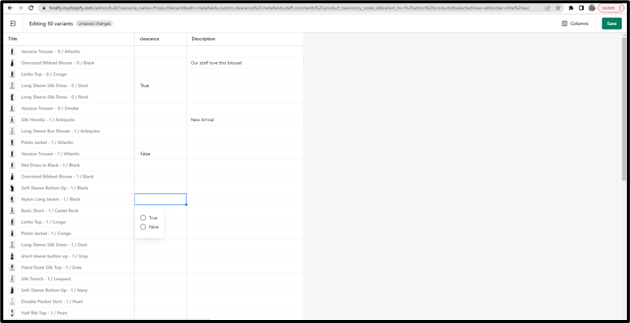
You’ll see that here I have highlighted ‘Product&edit’. This means what we are bulk editing are products. However, we want to bulk edit variants. So we need to change this to ‘ProductVariant&edit’. Go ahead and make this change directly in the URL.
The next change we need to make to the URL is adding the namespace and key of the variant(s) you want to appear in the bulk editor. This works the same as the above instructions - simply write the metafield definition (separating each one with %2C if needed).
Now your URL should look something like this: https:// [Your Store's Domain Name] /admin/bulk?resource_name=ProductVariant&edit=metafields.custom.clearance%2Cmetafields.staff.comments%2Cproduct_taxonomy_node_id&return_to=%2Fadmin%2Fproducts&selectedView=all&order=title%20asc
Hit enter.
For more information about Findify Search and Merchandising, including resources on how best to use metafields, go to www.findify.io or email [email protected].
Updated almost 2 years ago
