Merchandising Use Cases
In traditional brick-and-mortar stores, merchants (on a continuous basis) are arranging and rearranging store inventory and layout in order to promote certain products. As you undoubtedly already know, this process is known as merchandising.
But did you know that it’s just as important to merchandise in your online store as it is in your physical store?
Using a winning combination of machine learning and human intelligence, ecommerce merchants can (and should) maximize their store’s earning potential using Findify’s best-in-class merchandising capabilities.
Findify’s unique AI algorithm optimizes the performance of the store’s search and category pages, showing shoppers the most relevant products for them, while merchandising adds the ability to tactically push items as stipulated by the merchant in order to meet business targets - all WITHOUT sacrificing relevancy for the shopper.
Below, we have collected the most common merchandising use cases and outlined exactly how to achieve these desired goals from within the Findify dashboard.
1. Highlight Collaborations
I have a collaboration with a brand/influencer that I want to highlight.
Use Case:
Many brands are currently exploring the benefits of influencer marketing - collaborating with a popular social media personality in order to achieve a specific business goal.
This will undoubtedly include having the influencer push the objective (or, indeed, product) on their channels, but it could also mean highlighting the collaboration on the merchant’s store in order to increase the merchant’s clout with shoppers who are aware of the influencer. Perhaps if they know (and admire) the influencer, they will be more likely to buy whatever product or range they are promoting.
How To:
In this case, merchants can use Findify’s merchandising suit to either Pin or Promote the item(s) in question, depending on the amount of items to be highlighted.
Method A - Pinning. To be used if you have collaborated on only one (or only a few) products. Here, you would use the pinning functionality to pin items to specific slots within search or within collections. Click here to learn how to pin items.
Method B - Promoting. To be used if you have collaborated on many items, or even a whole range. Here, you would use the Promote functionality to push all items in the series higher, without locking in their specific position. When you do this, it means the products will have increased visibility, but Findify’s AI algorithm will still determine the specific ranking of products, based on the unique behaviour of the individual shopper.
To do this:
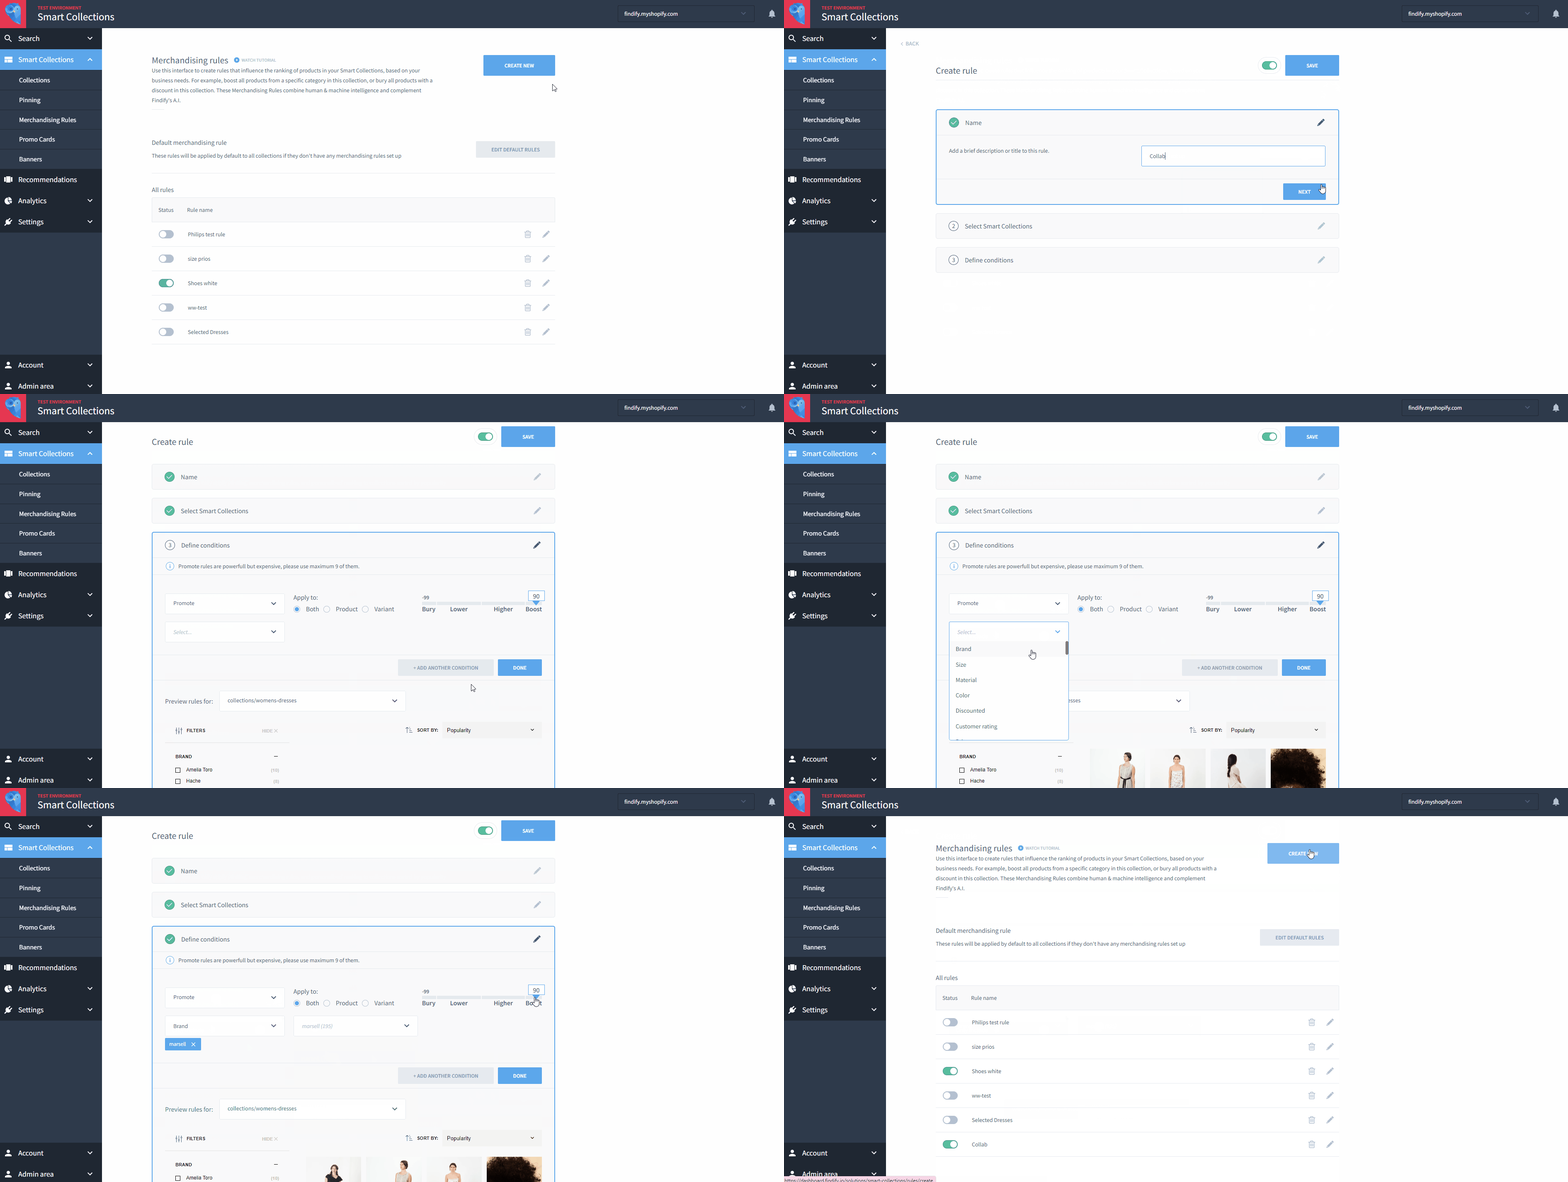
- Go to your Findify Merchant Dashboard and navigate to either Search > Merchandising Rules or Smart Collection > Merchandising Rules.
- Click ‘Create New’.
- Create a title, which is for internal use only.
- For Search: Under ‘Define Search Terms’ set what queries you want to lead to the collaboration items. For Smart Collections: Select the appropriate collection.
- Under ‘Define Conditions’: Select ‘Promote’ and then select whatever field you desire. Perhaps it is a specific brand, or perhaps you have created a tag for these items etc etc.
- Select whether to apply to product or variant or both.
- Select a percentage on the slider: use the right hand side (the 'plus' side) to determine the degree of the promotion.
- Click ‘Done’ and click ‘Save’.
2. Sell Out High Stock
I have too much stock of a bulky item which is costing me money to store in a warehouse. I want to slim down this inventory.
Use Case:
So you bought a lot of patio furniture recently, ready to ship these items out in advance of and during the summer months - except the weather was unforeseeably bad this year, and you didn’t sell as many as you had hoped. Now, these relatively bulky items are languishing in a warehouse, costing you storage fees. You need to get them out the door as quickly as possible.
How To:
In this case, merchants can use Findify’’s merchandising suite to Promote these items, setting a rule based on the amount of items currently in stock.
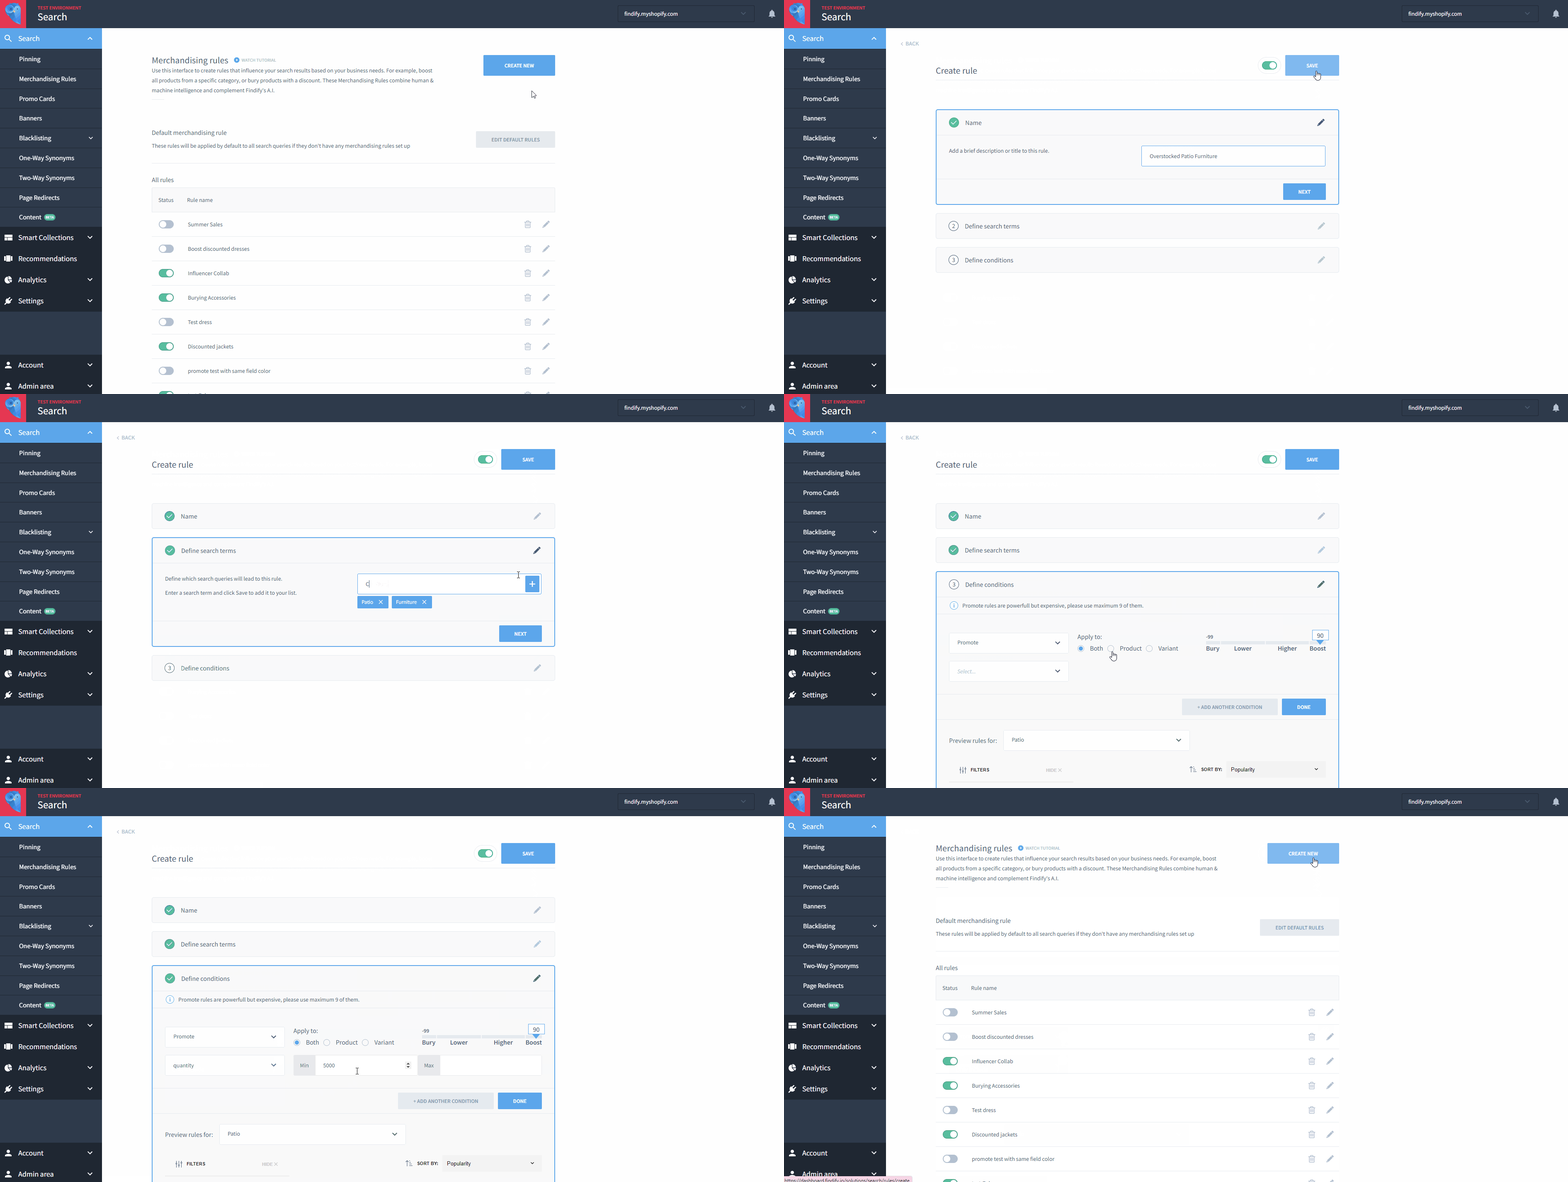
Method A - Boosting using a specific Merchandising Rule. To be used if you want shoppers to see the desired products after they have conducted a relevant search term or clicked into a relevant collection. To do this:
- Go to your Findify Merchant Dashboard and navigate to either Search > Merchandising Rules or to Smart Collection > Merchandising Rules.
- Click ‘Create New’.
- Create a title, which is for internal use only.
- For Search: Under ‘Define Search Terms’ set what queries you want to lead to the boosted items. For Smart Collections: Select the appropriate collection.
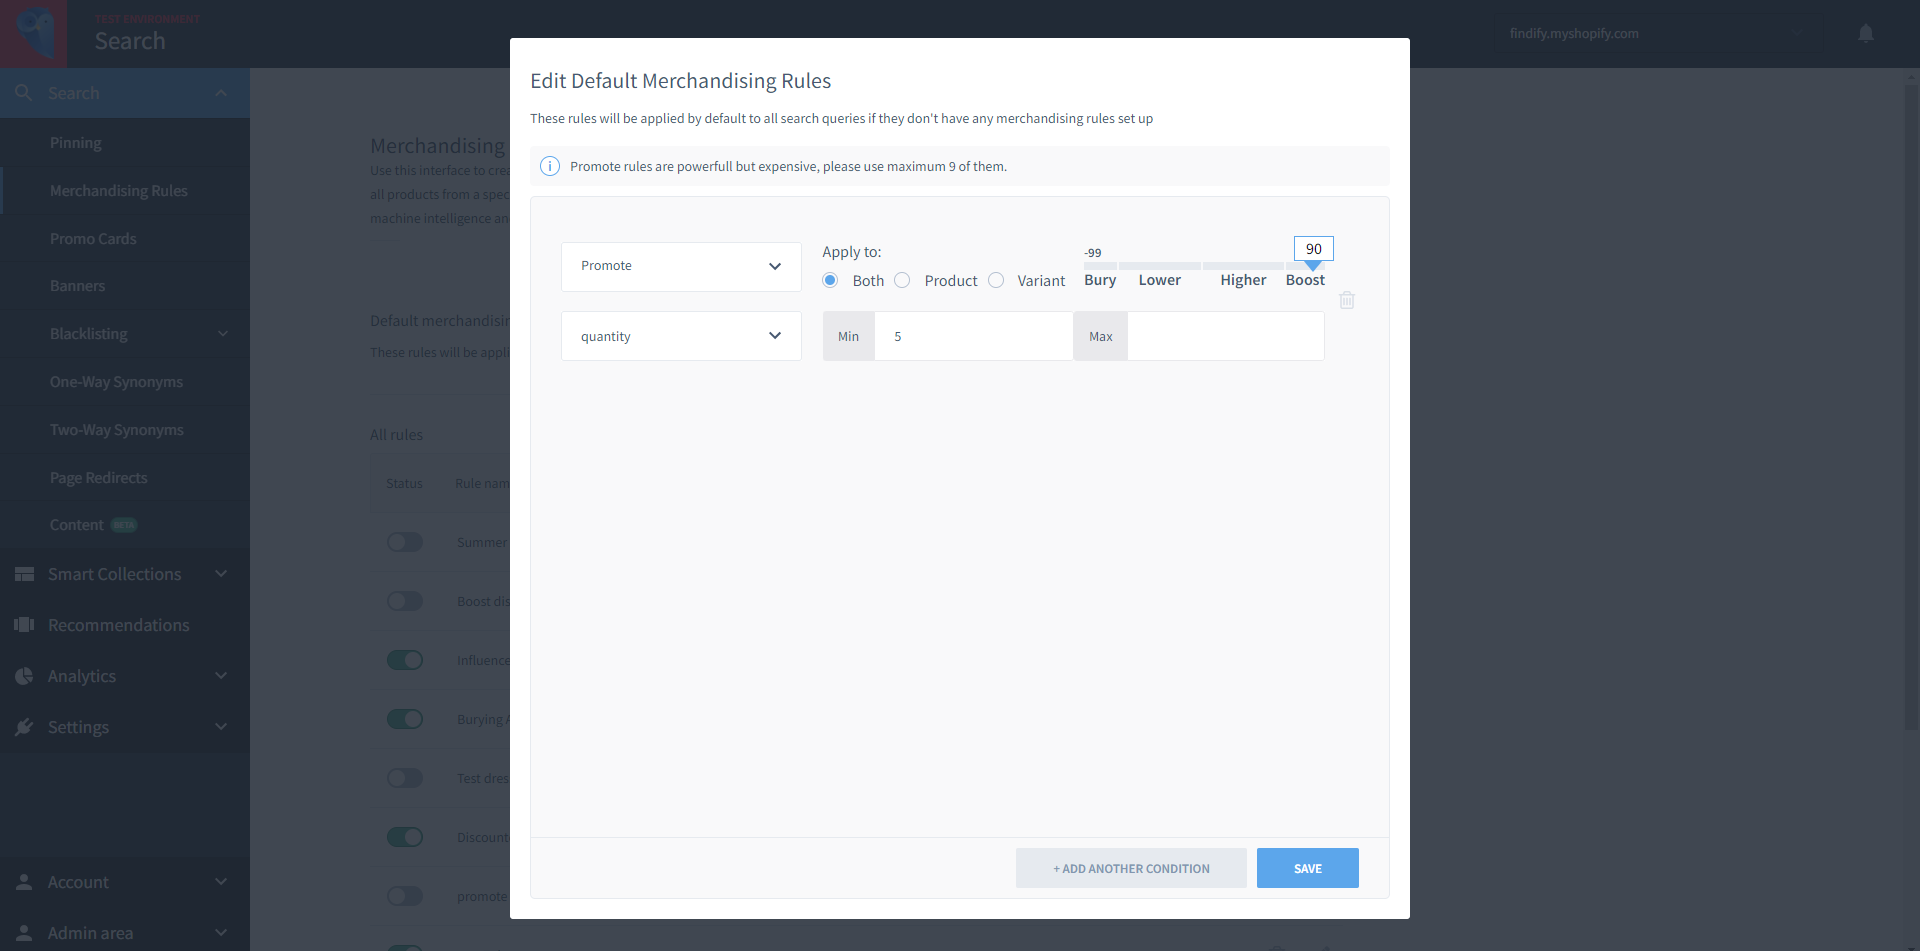
- Under ‘Define Conditions’: Select ‘Promote’ and then select the ‘Quantity’ field. You can then merchandise based on how many items of a product you have in stock (if the stock levels fall below the minimum stipulated, the product will cease to be Promoted. You can choose to leave the upper limit blank if desired).
- Select whether to apply to product or variant or both.
- Select a percentage on the slider: use the right hand side (the 'plus' side) to determine the degree of the promotion.
- Click ‘Done’ and click ‘Save’.
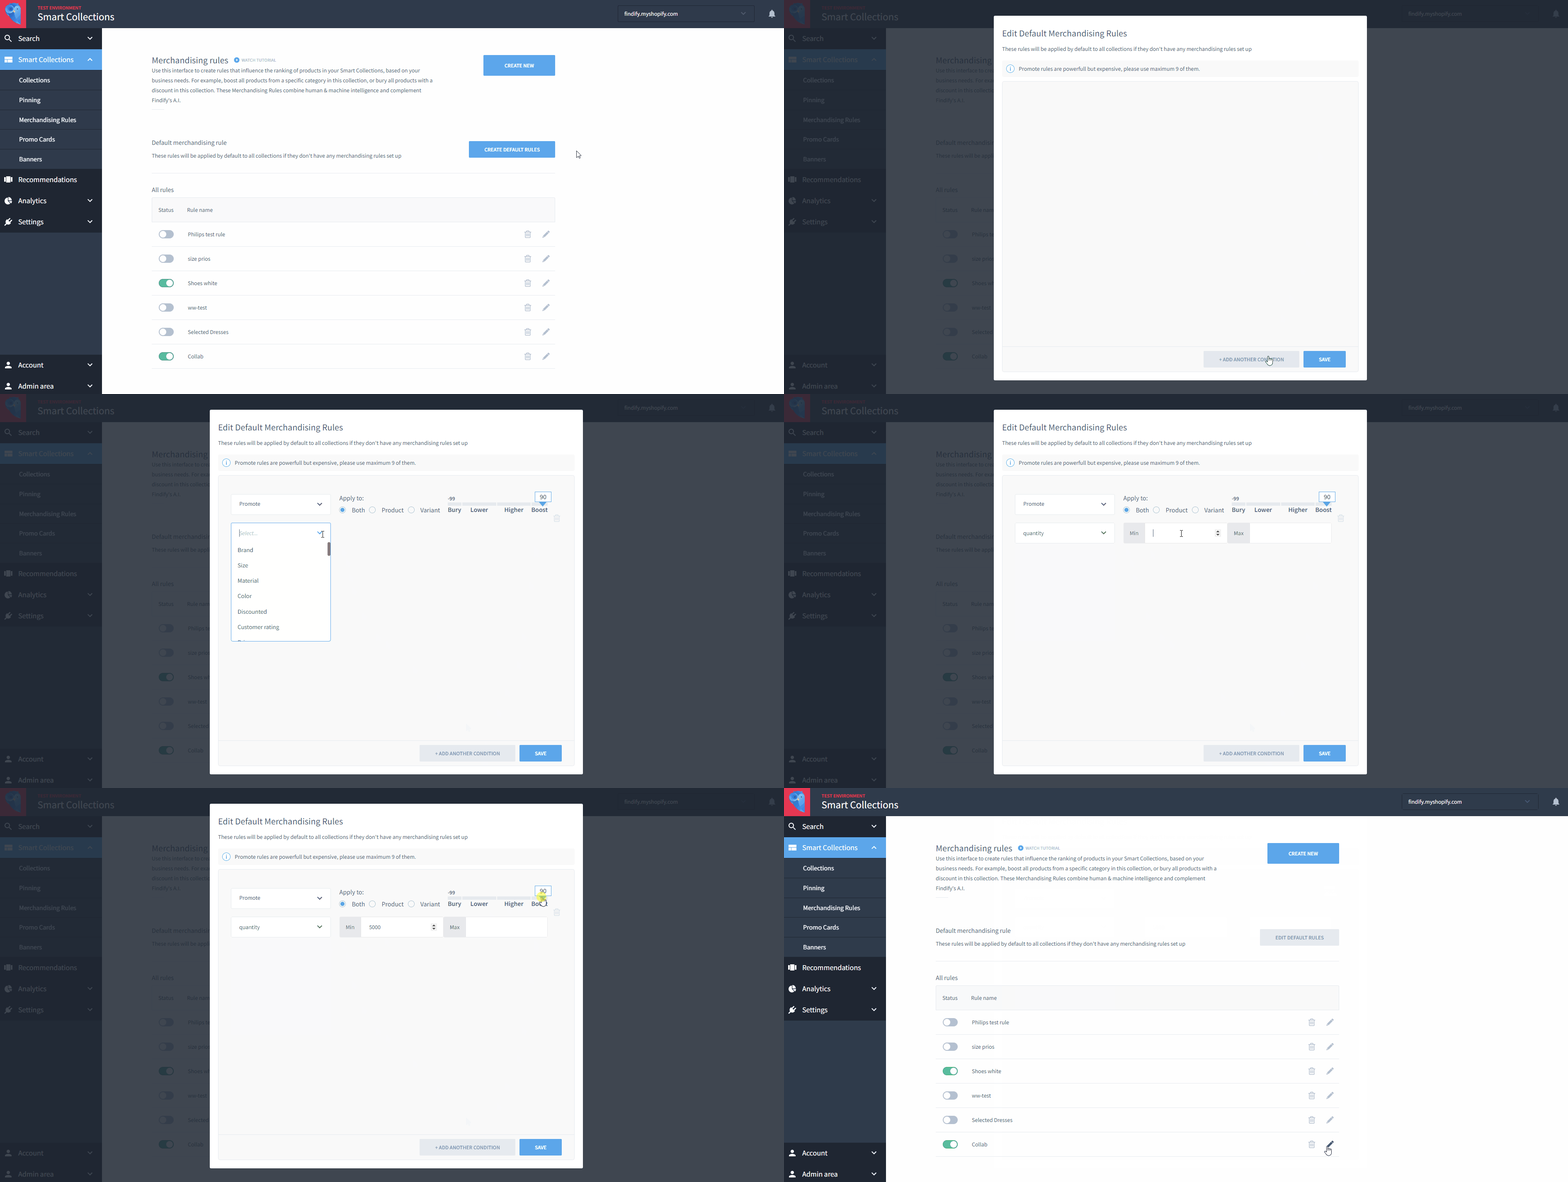
Method B - Boosting using a default Merchandising Rule. To be used if you want to boost the products storewide across all non-merchandised queries and/or collections. To do this:
- Go to your Findify Merchant Dashboard and navigate to either Search > Merchandising Rules or to Smart Collection > Merchandising Rules.
- Click ‘Create Default Rule’.
- Select ‘Promote’.
- Select ‘Quantity’.
- Select whether to apply to product or variant or both.
- Define a high range (if the stock levels fall below the minimum stipulated, the product will cease to be Boosted. You can choose to leave the upper limit blank if desired).
- Select a percentage on the slider: use the right hand side (the 'plus' side) to determine the degree of the promotion.
- Hit ‘Save’.
3. Sell Out Low Stock
I have only a few items left of a specific product and I will not be restocking. I need to get rid of these last few items.
Use Case:
It’s a good problem to have - your stock has been selling like hot cakes! Nevertheless, best practice is to clear the line out entirely if you do not intend to restock and so you still need to get rid of those last few pesky items - without accidentally creating demand for more of the items than you have. Within Findify, there are two ways to do this.
How To:
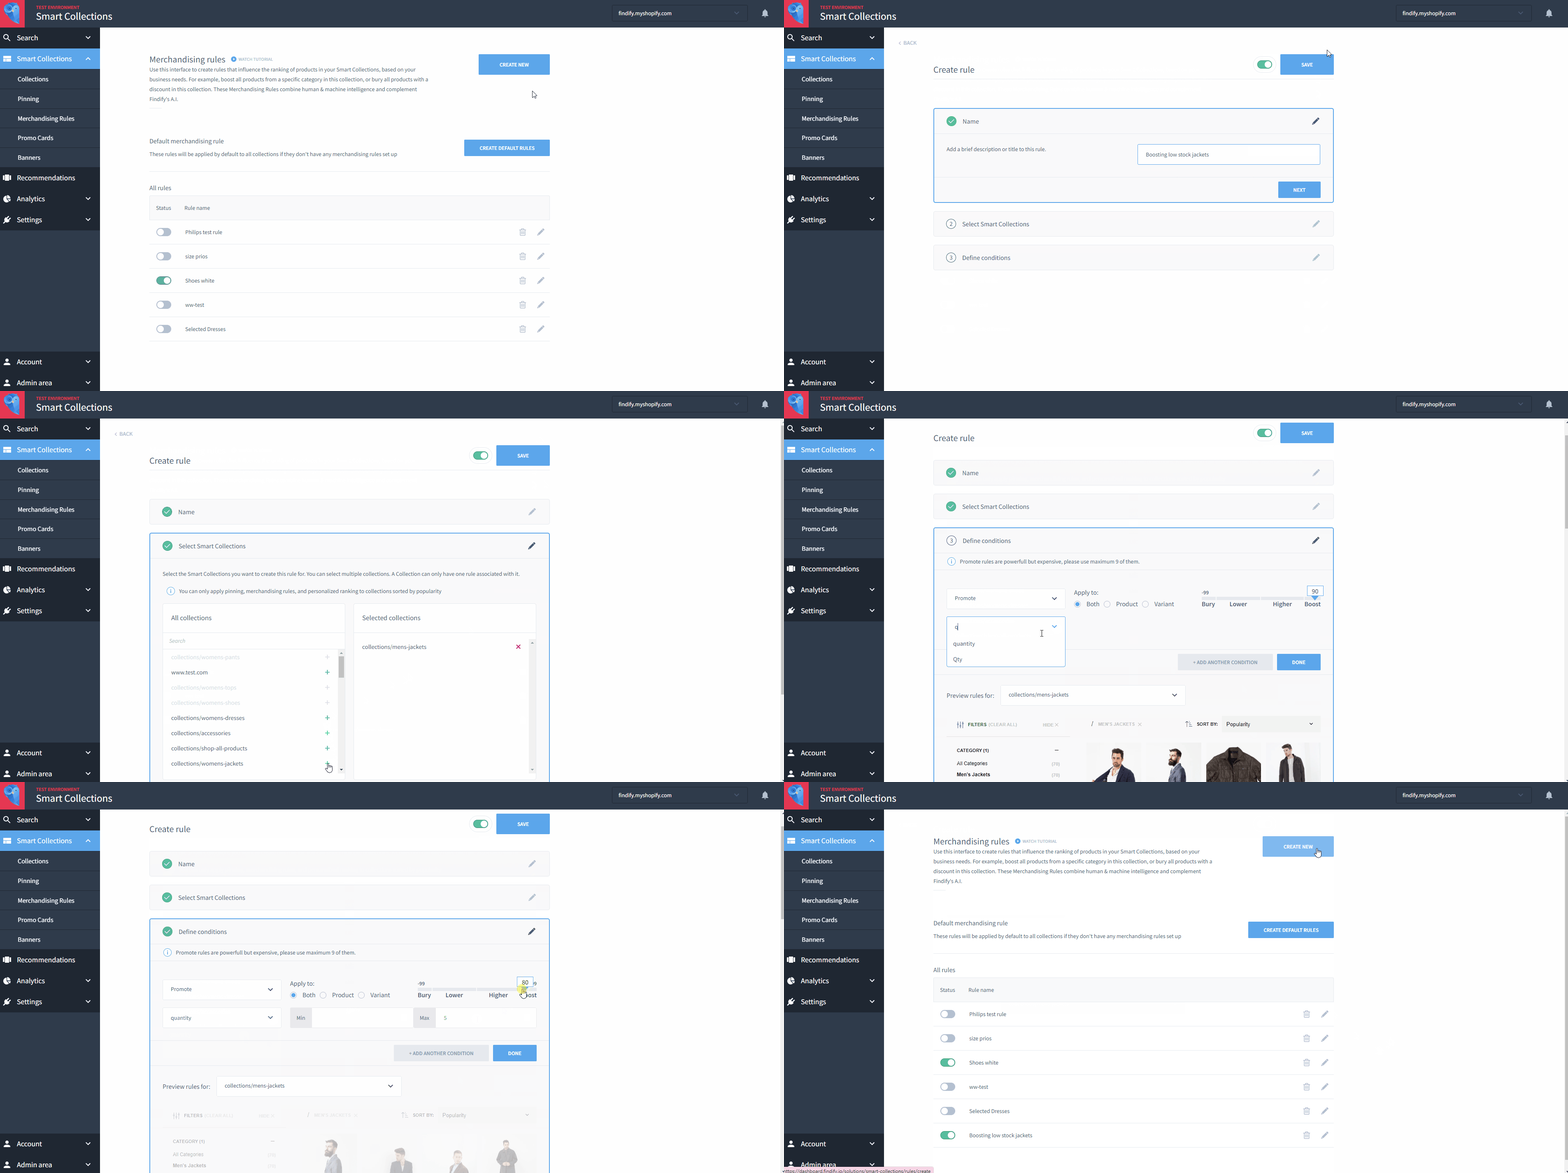
Method A - Promoting using a specific Merchandising Rule. To be used if you want shoppers to see the desired products after they have conducted a relevant search term or clicked into a relevant collection. To do this:
- Go to your Findify Merchant Dashboard and navigate to either Search > Merchandising Rules or Smart Collection > Merchandising Rules.
- Click ‘Create New’.
- Create a title, which is for internal use only.
- For Search: Under ‘Define Search Terms’ set what queries you want to lead to the boosted items. For Smart Collections: Select the appropriate collection.
- Under ‘Define Conditions’: Select ‘Promote’. Then select the ‘Quantity’ field. You can then merchandise based on how many items of a product you have in stock (if the stock levels rise above the maximum stipulated, the product will cease to be Boosted. You can also choose to leave the lower limit blank if desired).
- Select whether to apply to product or variant or both.
- Select a percentage on the slider: use the right hand side (the 'plus' side) to determine the degree of the promotion.
- Click ‘Done’ and click ‘Save’.
Method B - Promoting using a default Merchandising Rule. To be used if you want to promote the products storewide across all non-merchandised queries and/or collections. To do this:
- Go to your Findify Merchant Dashboard and navigate to either Search > Merchandising Rules or Smart Collection > Merchandising Rules.
- Click ‘Create Default Rule’.
- Select ‘Boost’.
- Select ‘Quantity’.
- Define a low range (if the stock levels rise above the maximum stipulated, the product will cease to be Boosted. You can choose to leave the lower limit blank if desired).
- Select whether to apply to product or variant or both.
- Select a percentage on the slider: use the right hand side (the 'plus' side) to determine the degree of the promotion.
- Hit ‘Save’.
4. Push High Margin Items
I would like to push certain products to maximise my revenue, such as high margin items, or my biggest profit generating items.
Use Case:
As every merchant knows, not all sales were created equal. Due to a number of different factors, sales of some items are worth more to merchants than others. It makes sense, therefore, for merchants to want to maximise these sales. You can achieve this goal within Findify by using the powerful merchandising suite of tools.
How To:
Method A - Promoting using a specific Merchandising Rule. To be used if you want shoppers to see the desired products after they have conducted a relevant search term or clicked into a relevant collection. To do this:
Preparation:
- Make cost available as a field in your feed.
- Ask the Findify Team to set up a new field calculating margin level [(Sales Price - Cost)/Sales Price].
In the dashboard:
- Go to your Findify Merchant Dashboard and navigate to either Search > Merchandising Rules or Smart Collection > Merchandising Rules.
- Click ‘Create New’.
- Create a title, which is for internal use only.
- For Search: Under ‘Define Search Terms’ set what queries you want to lead to the boosted items. For Smart Collections: Select the appropriate collection.
- Under ‘Define Conditions’: Select ‘Promote’. Then select ‘Margin Level’. Suggestion is to boost products above a threshold value, for example, above 60%.
- Select whether to apply to product or variant or both.
- Select a percentage on the slider: use the right hand side (the 'plus' side) to determine the degree of the promotion.
- Click ‘Done’ and click ‘Save’.
Method B - Promoting using a default Merchandising Rule. To be used if you want to promote the products storewide across all non-merchandised queries and/or collections. To do this:
Preparation:
- Make cost available as a field in your feed.
- Ask the Findify Team to set up a new field calculating margin level [(Sales Price - Cost)/Sales Price].
In the dashboard:
- Go to your Findify Merchant Dashboard and navigate to either Search > Merchandising Rules or Smart Collection > Merchandising Rules.
- Click ‘Create Default Rule’.
- Under ‘Define Conditions’: Select ‘Boost’. Then select ‘Margin Level’. Suggestion is to boost products above a threshold value, for example, above 60%.
- Select whether to apply to product or variant or both.
- Select a percentage on the slider: use the right hand side (the 'plus' side) to determine the degree of the promotion.
- Click ‘Done’ and click ‘Save’.
5. Hide OOS Products
I do not want my customers to see items that are not available to buy.
Use Case:
Let’s say that you’re browsing an ecommerce website and you find a product that is the perfect fit for you and falls within your budget. You navigate to the product page and decide to buy the product... and it’s out of stock. Now you have to start all over again.
This is incredibly frustrating for the shopper, and it’s also bad for your SEO. Thankfully, there are ways to mitigate this issue.
How To:
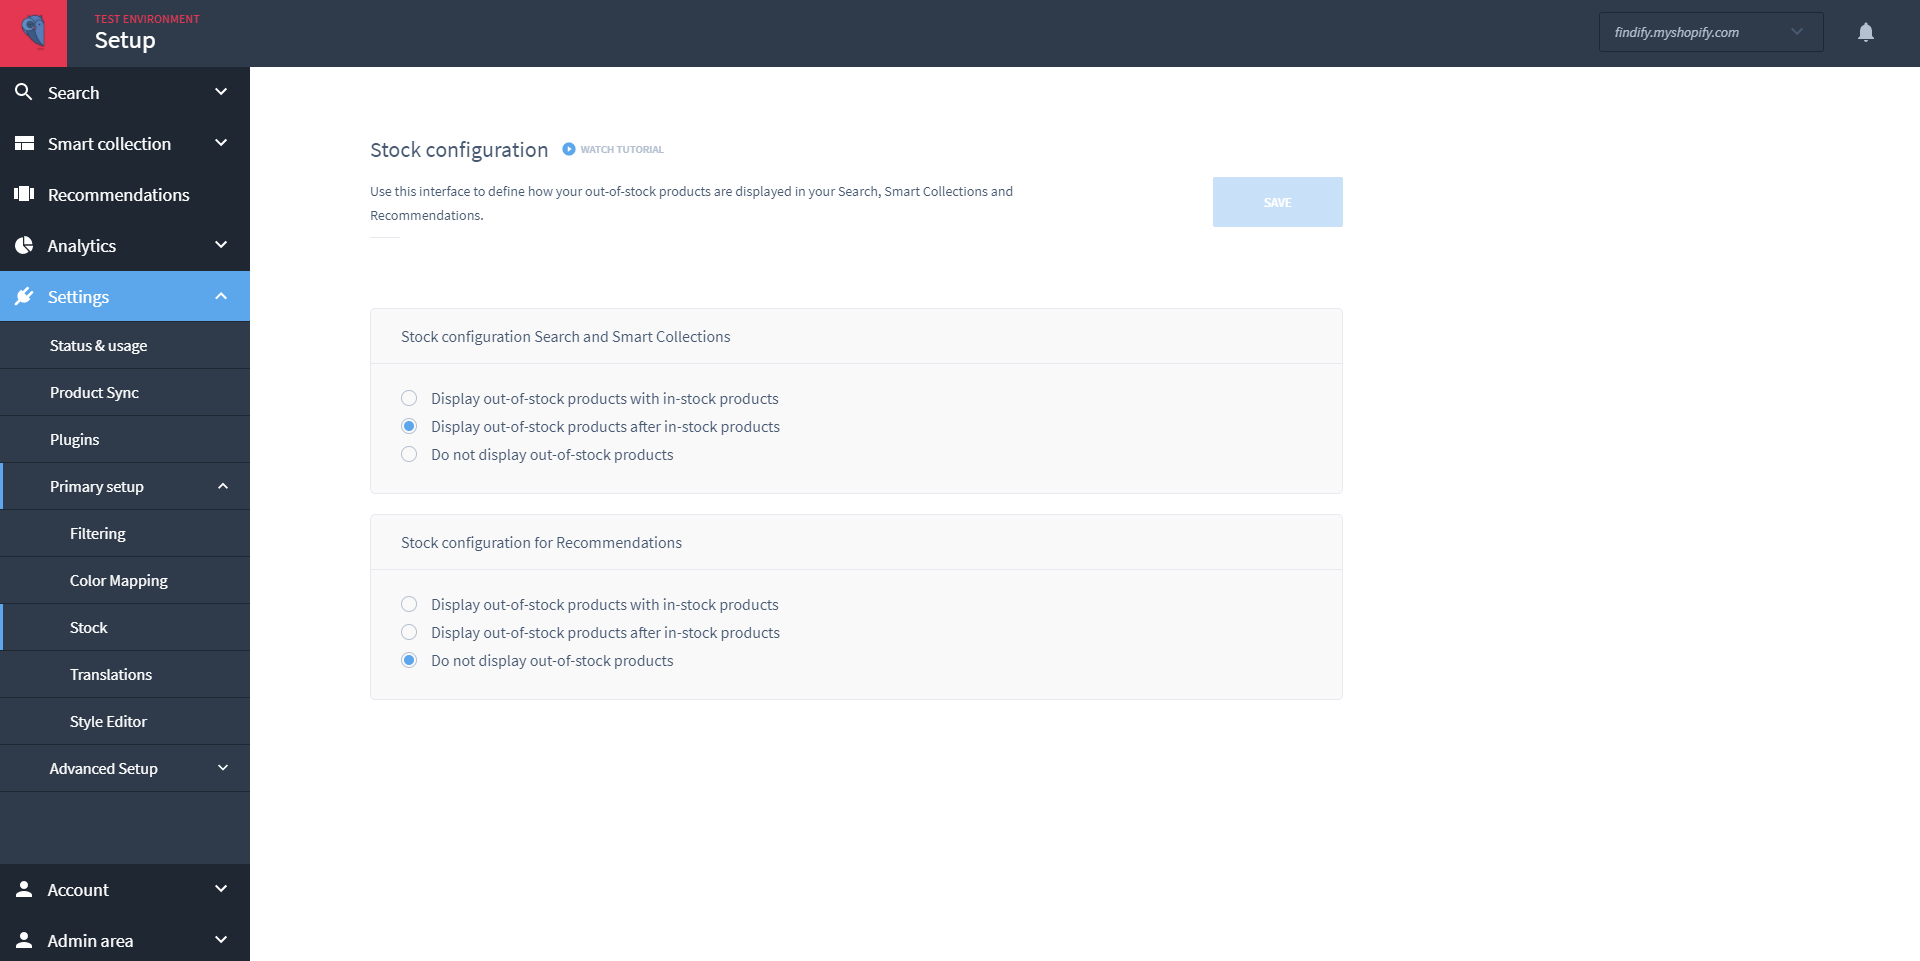
Method A - The easiest way to control Out of Stock settings within Findify is to do so via the dedicated capability. Go to your Findify Merchant Dashboard, and navigate to Settings > Primary Setup > Stock.
This option is set up to only affect the products that are actually not available. For products that you’ve defined to continue selling (for example, if the items are being dropshipped), they will not be affected by the oos-options.
Method B - You can also exert specific control using Findify merchandising rules. You would do this in cases where you would only want to affect oos-products on specific pages. For these cases, you can easily apply a merchandising rule as follows:
- Go to your Findify Merchant Dashboard and navigate to either Search > Merchandising Rules
- or Smart Collection > Merchandising Rules.
- Click ‘Create New’.
- Create a title, which is for internal use only.
- For Search: Under ‘Define Search Terms’ set what queries you want to lead to the boosted items. For Smart Collections: Select the appropriate collection.
- Under Define Conditions: Select ‘Promote’. Then filter based on quantity. For example, in the upper field, set quantity to zero. (Note: Make sure this is entered into the UPPER field. Entering zero in the lower field may have an adverse impact on your store as it could cause all products to be excluded.)
- Select whether to apply to product or variant or both.
- Select a percentage on the slider: use the right hand side (the 'plus' side) to determine the degree of the boosting or use the left hand side (the 'minus' side) to determine the degree of burying.
- Click ‘Done’ and click ‘Save’.
6. Boost Hero Lines
I want my customers to see my hero lines before they are shown any accessory items.
###Use case:
Let’s say, for example, I am running a women’s fashion store. The vast majority of my items are clothing, however I do also stock some accessory items such as sunglasses, handbags, and earrings.
But I mainly want to push my hero lines, my main products, NOT the accessory items. Therefore, I want to ensure shoppers see my hero lines before they are shown any sunglasses, handbags, or earrings. I can do this in one of two ways, depending on my business goals.
How to:
Method A - To be used when you have one hero line with strategic importance, for example dresses. You want this line to be shown as much as possible. In this case, you would then boost this line. To do this:
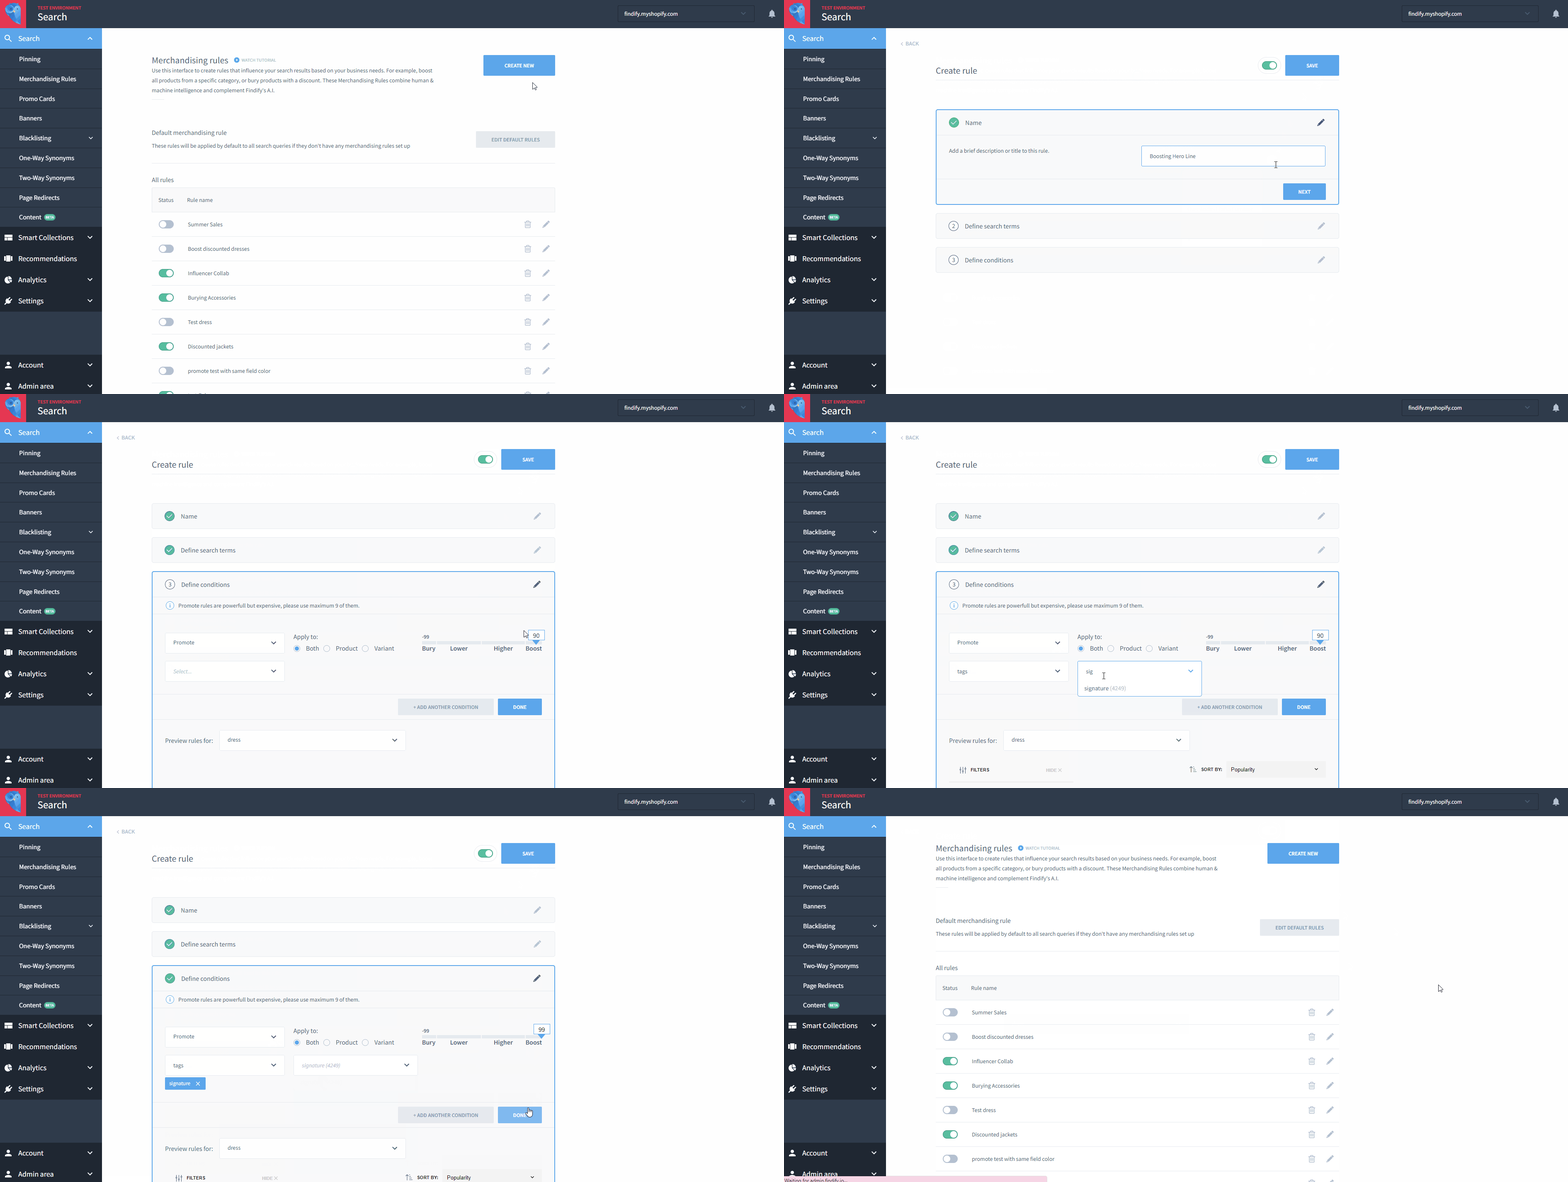
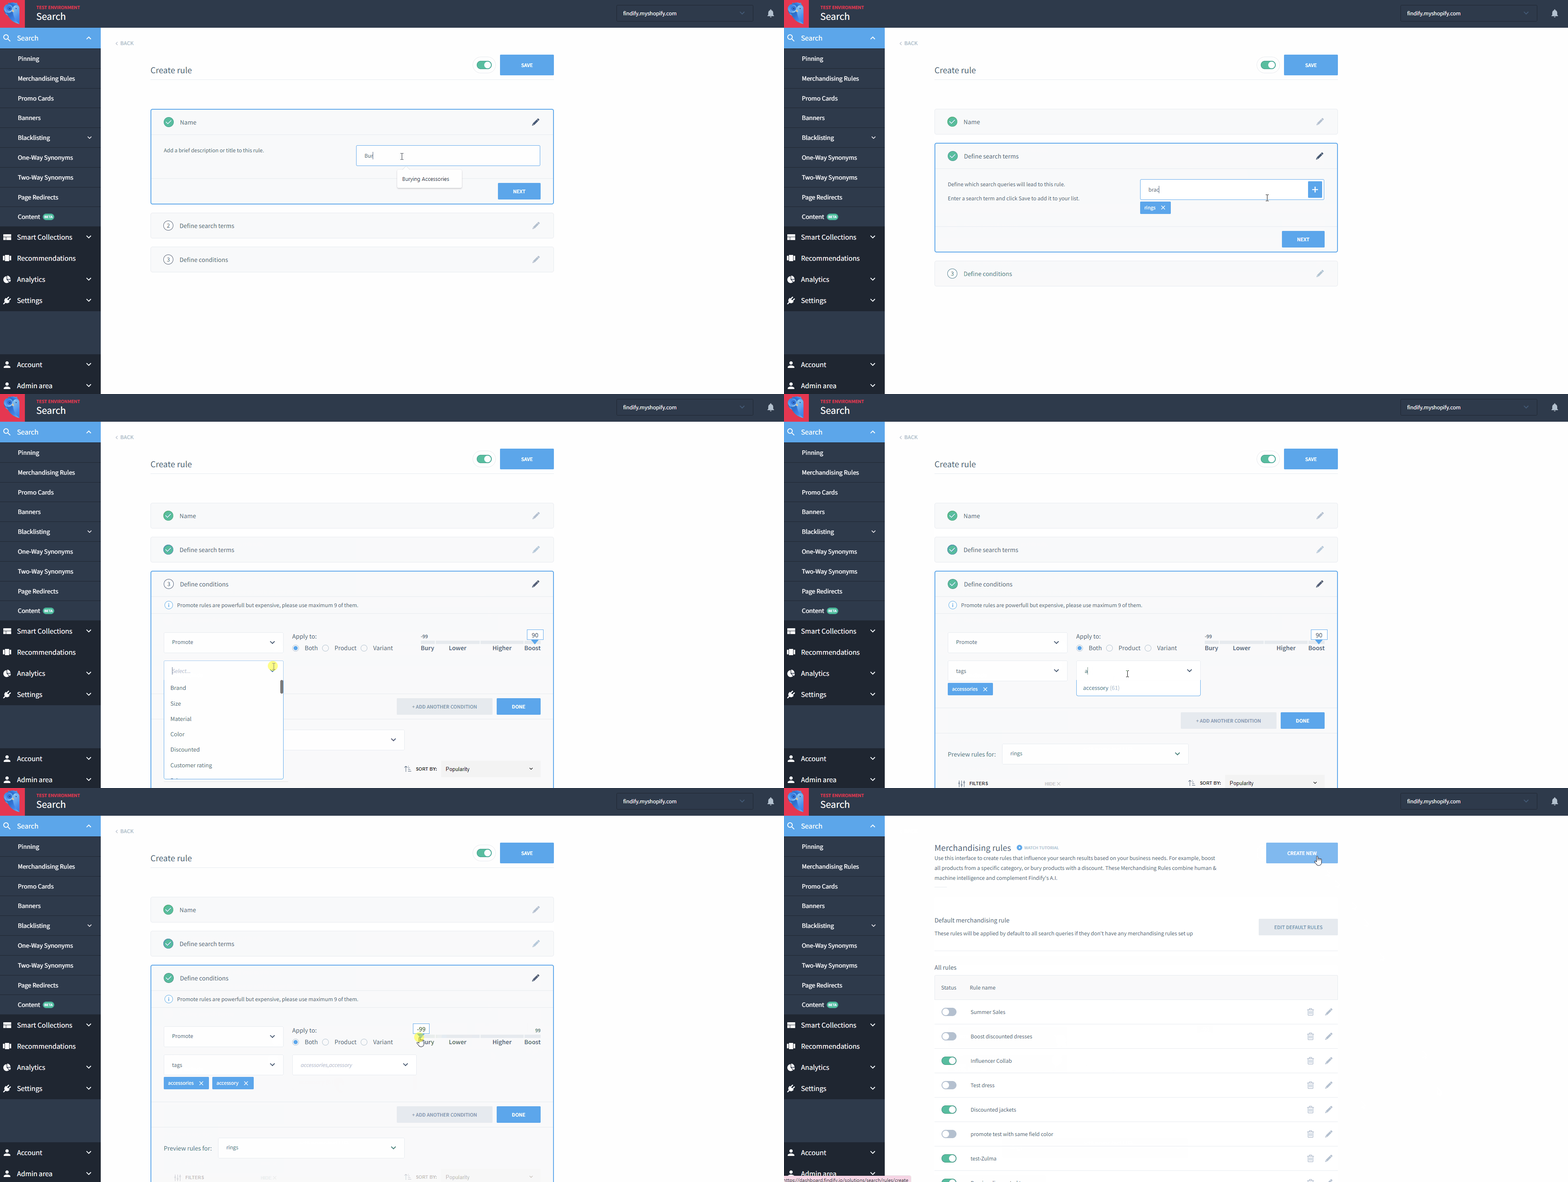
- Go to your Findify Merchant Dashboard and navigate to either Search > Merchandising Rules or Smart Collection > Merchandising Rules.
- Click ‘Create New’.
- Create a title, which is for internal use only.
- For Search: Under ‘Define Search Terms’ set what queries you want to lead to the boosted items. For Smart Collections: Select the appropriate collection.
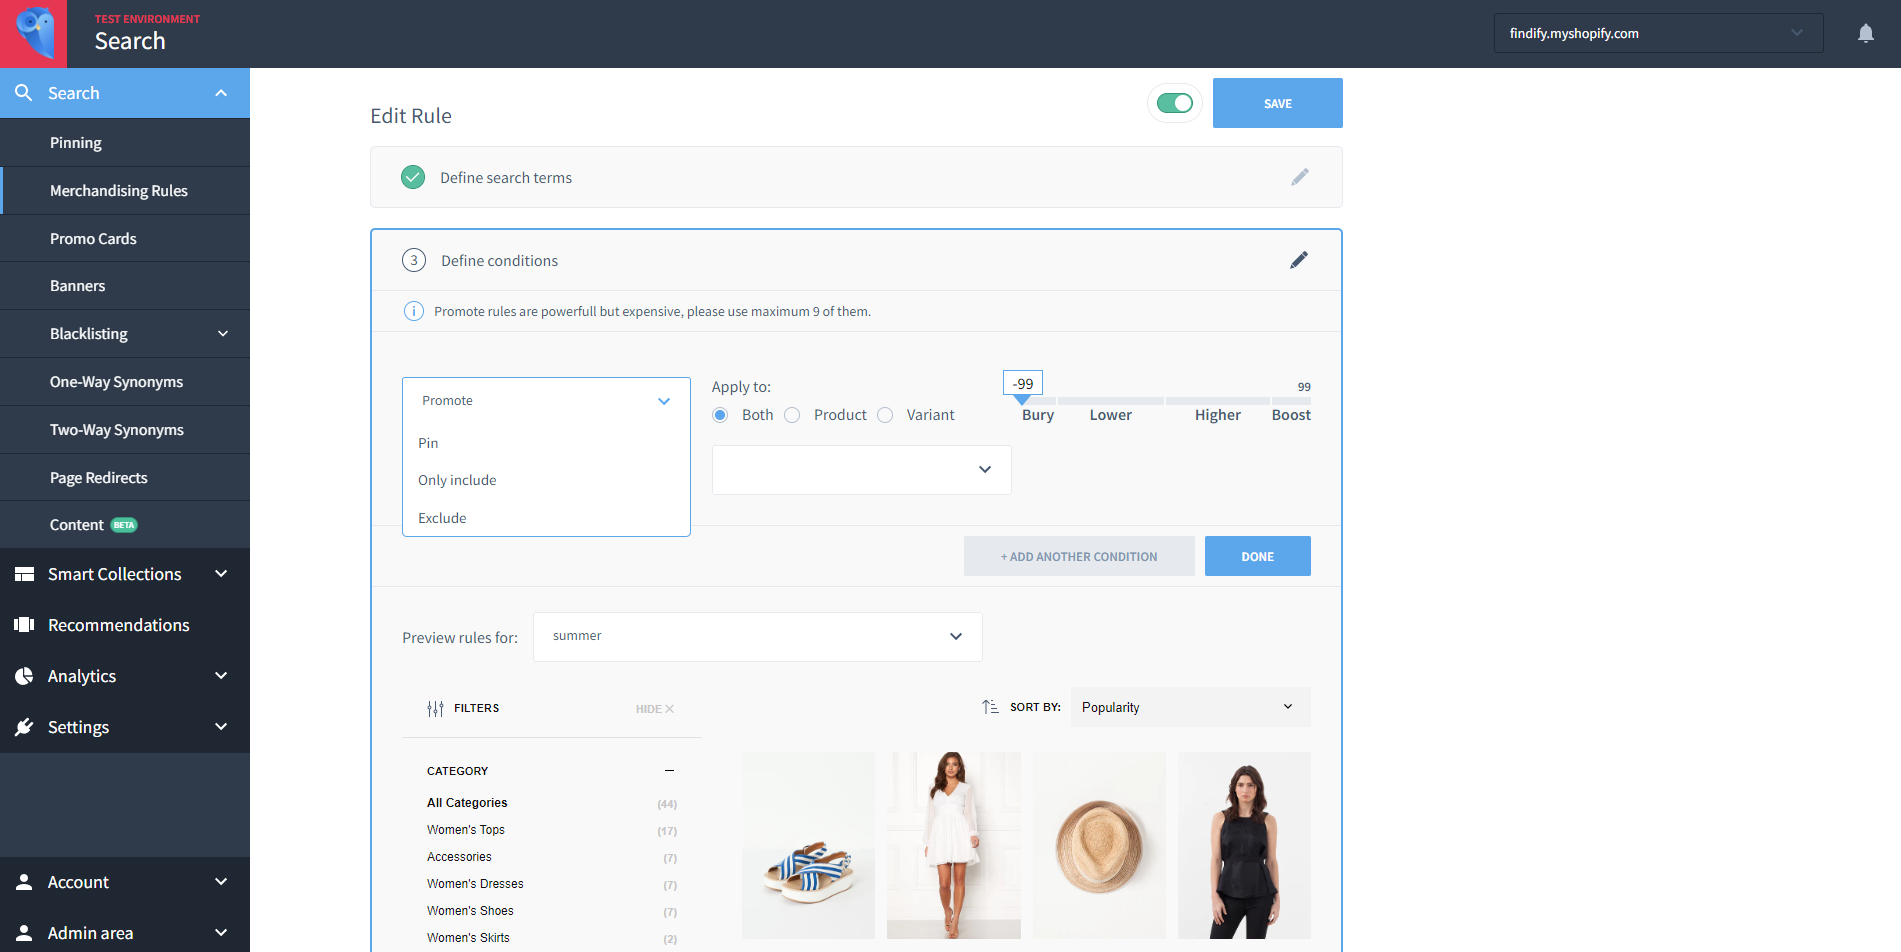
- Under ‘Define Conditions’: Select ‘Promote’. Then select the desired field which includes your hero line. This could be a Brand, a Category, a Tag etc etc.
- Select whether to apply to product or variant or both.
- Select a percentage on the slider: use the right hand side (the 'plus' side) to determine the degree of the promotion.
- Click ‘Done’ and click ‘Save’.
Method B - To be used when you have supportive lines that need to be part of the assortment, such as accessories, but should never be in the limelight. In this case, you would bury these items. To do this:
- Go to your Findify Merchant Dashboard and navigate to either Search > Merchandising Rules or Smart Collection > Merchandising Rules.
- Click ‘Create New’.
- Select ‘Promote’.
- Select the desired field which includes the accessory items you want to target. This could be a Brand, a Category, a Tag etc etc.
- Select whether to apply to product or variant or both.
- Select a percentage on the slider: use the left hand side (the 'minus' side) to determine the degree of the burying.
- Click ‘Save’.
7. Only Include High Value Products
I want to create a collection/category page that includes only high value products.
Having a collection that includes only high value products can be extremely useful for ecommerce merchants. Once created, merchants can heavily push this collection in their marketing channels, safe in the knowledge that they are only spending money promoting items that will yield high value results for them.
But what happens when you have lower value product in a collection, that you want to hide in a clean way without affecting the configuration of the collection? In this case, you would use a merchandising rule.
Use case:
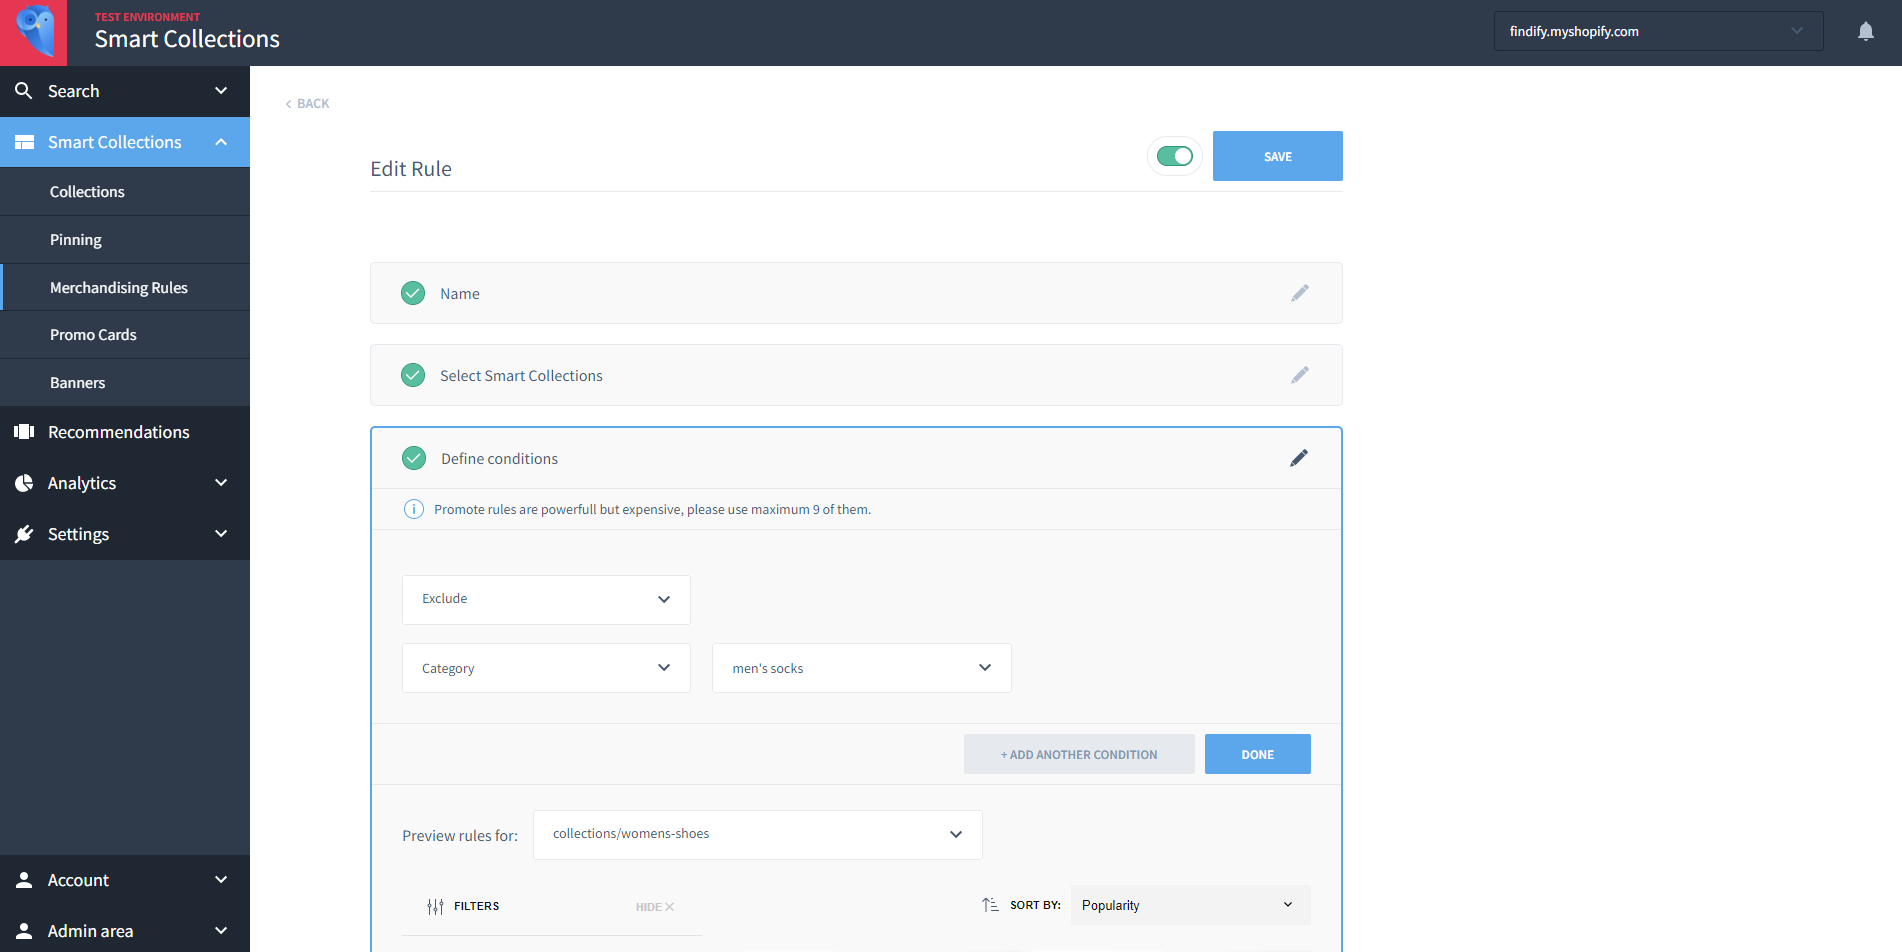
A footwear merchant has a brand orientated collection titled ‘Adidas’ which features different types of Adidas shoes but also Adidas socks. The merchant doesn’t want to change the configuration of the collection to remove the socks, but also doesn’t want certain shoppers to be presented with socks when viewing the collection.
How to:
In this case, the merchant would go to their Findify Merchant Dashboard and complete the following steps:
- Go to your Findify Merchant Dashboard and navigate to Smart Collection > Merchandising Rules.
- Click ‘Create New’.
- Create a title, which is for internal use only.
- Select the Smart Collection you want the rule to apply to.
- Under ‘Define Conditions’
- Select ‘Exclude’.
- Then select the ‘Category’ field. (In this case it would could be Clothing, or Socks, etc)
- Click ‘Done’ and click ‘Save’.
Updated almost 2 years ago
