FAQ Shopify Integration
Commonly asked questions regarding Shopify integration
Adding a new filter
Options or Tags?
To add a new filter to a Shopify product, there are two possibilities:
- If a product has several variants and you wish to associate the filter at the variant level, then it makes more sense to add an option.
For instance, if you have 3 T-Shirts available in the colors "blue", "green" and "red", you will have to create 3 options "red", "blue" and "green". Here, you characterize the variant and associate the information at the variant level. - On the other side, if you wish to add a filter on the product level (in case there are no options or if the filter applies to all options), then it makes more sense to add a tag associated with the product.
Configure a tag so Findify can read it
If you wish to add an information in the tag, you need to prefix this information by a common word. For instance, if you wish to add the "gender" information to a T-Shirt product, valid values would be:
- gender:Male
- gender:Female
- gender:Mixed
- gender:another value
After configuring the tags, you would need to go to our dashboard -> Setup -> Filtering, and click on 'Create Field' button:

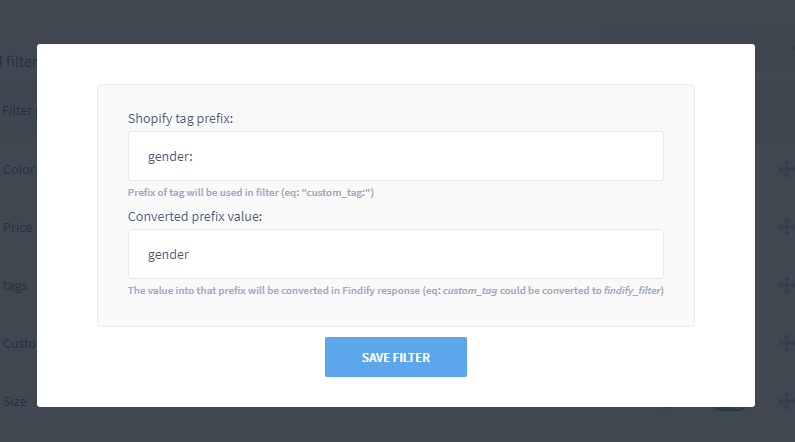
In the popup window, you would need to provide the prefix used in the tag setup, i.e. gender:, and the field name:

After you complete the filter setup, you would need to do a product sync by going to our dashboard -> Sync, Status and Usage -> Product Sync, and click on 'Product Sync'.
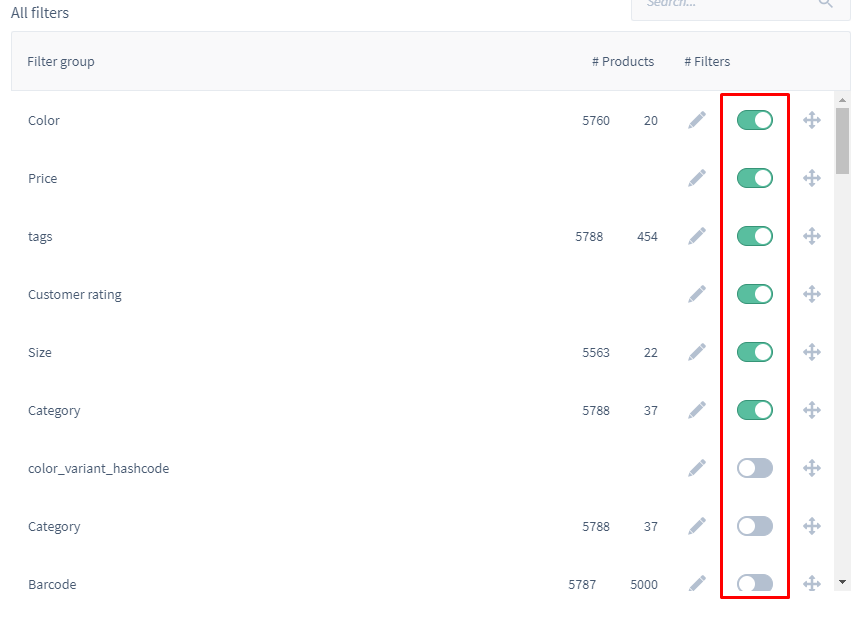
When the sync is done, you will be able to enable/disable filters in our dashboard -> Setup -> Filtering:

Display a hierarchy of categories
In order to have multiple levels of categories, you would need to:
- Go to a product page in Shopify
- In the "product_type" field, insert the symbol > between the different levels of your categories. For example: Home > Kitchen > Table
The modifications will take effect at your next product synchronization time.
Set several categories per product
If you want to specify several categories per product, you would need to:
- Go to the product page in Shopify
- In the "product_type" field, insert the symbol "###" between the different categories. For instance "Category 1 ### Category 2". This feature also works for the hierarchy of categories, for instance: "Cat 1 > Subcat 1 > Subsubcat1 ### Cat 2 > Subcat2".
The modifications will take effect at your next product synchronization time.
Nested Categories
Please Note: This change will only be reflected within Findify where it can be applied as a facet or filter products in configurations/merchandising. In Shopify, the full query will be read as ONE category value. If applied, ensure your Shopify configurations for e.g. Automated Collections are aligned accordingly.
'What's new' sorting option
By default, we are using the most updated date between variant.created_at and product.published_at dates. However, it's possible to override the default setting and use the following:
- only
created_aton product level - only
updated_aton product level - only
created_aton variant level - only
updated_aton variant level
Field mapping
In the Merchant Dashboard, the "filters" section contain fields names that you can set as filters. Findify is also retrieving some other fields to set them searchable by our search engine. The following table has been made to give you information from the origin of some of the fields in Shopify.
| Name in Findify | in Shopify | Searchable | Can be facetable |
|---|---|---|---|
| SKU | SKU of the variant | Yes | No |
| Title | Title of the product | Yes | No |
| Description | Description of the product | Yes | No |
| Price | Price of the variant | Yes | Yes |
| Category | Product Type | Yes | Yes |
| Brand | Product Vendor | Yes | Yes |
| Color | Option "color" of the variant if present | Yes | Yes |
| Material | Option "material" of the variant if present | Yes | Yes |
| Size | Option "size" of the variant if present | Yes | Yes |
| Barcode | Barcode of the variant | Yes | No |
| Custom name | Any option name you gave to your variants | Yes | Yes |
Updated over 4 years ago
